Category Archives: Learning Resources

Adventures with A.I. Coding Agents

My curiosity has gotten the best of me and I have been diving into using A.I. coding agents after holding off on it well after they started to become popular and trending in the industry. I’d like to share some things I’ve learned after using a couple agents to build a non-trivial Python application. I think I have developed some informed opinions at this point about how to work with them, how to avoid A.I. slop in addition to using them in a secure and safe way.

Spoiler Alert: A.I. Coding Agents cannot be used to replace any software engineer in my opinion. I suspected this from the beginning, but after actually using them for a bit now to see for myself, I feel more confident in this assertion.

As soon as you try to get them to do anything truly complex, the reliability tanks and the chances of them making mistakes or building something (even if without mistakes) which you didn’t want or intend in the first place increases (see my post on Chaos Theory and how the longer that dynamical systems run, the less you can predict or forecast their trajectory – it is the same with “letting the A.I. go” – small deviations accumulate and compound over time which ruins the final result).

You need “humans in the loop” constantly to get any meaningful or quality results. A.I. agents are tools that we can leverage with our knowledge and know-how as software engineers which can make our lives and work a little easier and a bit better.

Terms:

  • Token:  A character or set of characters (potentially a word, but not always). The question or sentence you give to an LLM as input is broken down into smaller chunks and pieces called tokens for processing.
  • Context: A window of “memory” which an LLM retains which contains contextual information about the problem domain or project you are asking about. When an LLM has information it needs in it’s context window, you are more likely to get a relevant and helpful response.
  • LLM: Large Language Model – these are programs that are essentially a long mathematical equation that predicts the next probable token given a set of previous tokens. If you give it, “Complete the following greeting: How are ___”, there’s a high chance it will guess “you?” as the final part. These systems are pattern-matching probabilistic machines. They do not understand anything like humans do, they are using statistics and probability along with the natural rules and statistical nature of language to predict the next token. (That is over-simplified, but it is the most important idea about how to think about them, IMO).
  • Coding Agent: A software program that leverages an LLM as an interface to use natural language (plain conversational English) to give coding instructions to, and carries out these instructions by manipulating files on your system, including source code files and folders.
  • A.I.: Artificial Intelligence – I only include this because when people say “A.I.” now, what they really mean usually is LLMs which are a particular incarnation of “A.I.”, but there are other branches of A.I. that are not natural language based.
  • Frontier Models: These are models that are the “latest and greatest” offered by companies such as OpenAI, Google, Anthropic and DeepSeek.

Why Use a Coding Agent?

  • It helps with some of the tedious tasks, saves time and speeds up development. By how much, you ask? Certainly not “10X”,  but by a bit.

Coding Agents can handle the simple tedious tasks such as “typing” and remembering syntax details for a particular programming language. This alone contributes to significant time savings that accumulate, saving you the time of looking up some syntax detail that you forgot or making typos which you have to later hunt down, correct and fix. Note, that you still need to know the syntax and language because you have to review the code and read it at every step to prevent bloat, entropy and divergence the agent will inevitably tend towards.

  • You can also use the coding AI agent as a pair. You can have it function as a more interactive “rubber duck“, so to speak, and have conversations about implementation, design and product planning, bouncing ideas off of it, have it bounce ideas off of you, and help with iterating towards refining a design and product plan.
  • If you’re working with a code base that is very difficult to understand, an agent can function as an aid to help break down and explain the code to you.
  • It can write the documentation. It will update and format the README to generate usage instructions, update notes on application structure or new feature sets, generate and format specifications and all the tedious extra tasks like that so you can spend more time on actual feature development.
  • You can use it to augment your effort by leaning on it for highly domain-specific knowledge. For example, some features I developed for my program depended on geological phenomena which I only have cursory knowledge of. I would have had to spend a lot of extra time reading up on geological processes and mathematical formulas I just don’t know currently. The coding agent was able to fill in that gap for me (and teach me some things about an interesting subject).

Besides the practical implication of the time savings, you might just find it fun.

Where Should You Start?

If you’re looking to dip your toes in the water and get going, I would recommend you first take at least one agentic A.I. course. I can recommend Anthony Alicea’s A.I. Assisted Development or Bob Martin’s Clean A.I.: Agentic Discipline. After going through these courses I felt like I had enough foundational knowledge to help me get started and catch me up on the basics of these tools.

A.I. Coding Agents

There are a number of different agents you can use. Some are integrated directly into your IDE (like GitHub Copilot in VS Code or Cursor) and some are used in the Terminal. I prefer agents in the Terminal because this slows me down and makes me converse with the agent as if it were someone I was pairing with.  I can leverage the agent for brainstorming on planning and implementation before just editing the code in place like an IDE integrated agent would inevitably tempt you to do. It encourages me to THINK first about the software and what I want to do more thoroughly.

The most “famous” of these agents is probably Claude made by Anthropic, but I primarily used these two:

  • Aider: This is one of the “older” agents that has been around longer than others and you use it in the terminal. It simulates working in a Paired Programming fashion and is free to use.
  • OpenAI Codex: This requires signing up for a subscription with OpenAI. I have a Plus subscription which does come with rate limits, but I’ve been able to get work done even with that in place. With Codex you can use OpenAI’s Frontier Models like GPT-5.5 at the time of writing.

How To Setup and Use A.I. Agents Safely

Security and privacy are a concern when using agentic A.I., especially if using Cloud models which may use or log your input for further training the models. Not to mention A.I. agents can sometimes have a “mind of their own” and make damaging changes to your system. Below are some things I learned and think are useful to keep in mind in light of this.

  • Usually, companies like OpenAI and Google offer a guarantee that they will not use your data as long as you purchase a paid plan or use the product under a paid tier.
  • Disable telemetry in whatever tool you are using.  For example, in Aider you can pass an argument --analytics-disable which will stop the program from sending any information in the background.
  • Use Docker Sandbox in Lockdown mode. This is a relatively new tool offered from Docker which is made specifically for running agentic A.I. in a sandboxed environment. The sandboxes are different from Docker Containers because they don’t share the system kernel like normal containers do. They are a microVM (Virtual Machine) that has its own kernel and separate resources providing a higher level of isolation. I recommend installing sbx which is the CLI tool for managing Docker Sandboxes, and make sure you start a sandbox in “Locked Down” mode. I personally would not use an agent outside of a sandbox like this to protect my system and control outbound/inbound connections.
  • Simply don’t grant agents access to sensitive parts of your system or application. For example, don’t allow access to the database or other critical infrastructure, files and folders. You can specify which files and folders are accessible with configuration in the agent and by using sandboxed environments which allow you to manage access control explicitly.
  • You can also host models locally with Ollama inside a Docker Sandbox for maximum privacy and control of your data. This requires a very powerful machine and hardware, however, and personally I was not impressed with the capability and results using local models vs. Cloud Frontier models.

Which Models Should You Use?

A good place to start is to explore online “Leaderboards” for A.I. coding models. You can Google search for these leaderboards to get an idea of how different models compare in benchmark testing and use cases. It’s good to overweight community leader boards as some “official” ratings might be biased because of the major A.I. companies funding some of these boards.

Models come in two flavors (there are also subtypes like “reasoning” and thinking, but topic for another day): Cloud and Local. I prefer using Cloud models because they are faster and more capable generally speaking. If you have a very powerful machine and graphics card, then you might be able to get sufficient performance with local models.

Below is a short list of ones to try at first, but is by no means complete. I may try to write a separate blog post exploring models and what I’ve found trying different ones out.

Frontier Models:

  • OpenAI GPT-5.5
  • Anthropic Claude Opus 4.7
  • Google Gemini 3 Pro
  • DeepSeek R1

Cheaper Models for Implementation (after planning):

  • GLM-5
  • MiniMax M2.5
  • Kimi K2.5
  • DeepSeek 3.2

Local Models:

In order to use local models, you can install Ollama for downloading the models to your machine and hosting them locally. You can check out my repo with a basic setup using Ollama and Docker Sandbox with Aider.

  • Ollama Qwen 3.6
  • Ollama Qwen 2.5 Coder

Useful Practices

Plan then Implement:

Generally, the pattern I’ve found cost effective is to use Frontier Models for planning out design and implementation of a feature, and then use a lesser powered cheap model for the actual implementation and coding.

For example, to plan out a new feature I’d like to add, I will use OpenAI’s GPT-5.5 or Gemini’s 3-Pro models to have a brainstorming session, hammering out details of the feature and having the agent record design decisions and implementation steps in a markdown file.  Once that markdown file is refined to a degree of specificity I’m happy with, I switch to a lower powered model like OpenAI’s GPT-5.4-mini or Google’s Gemini-2.5-Pro perhaps.

You can experiment with other models to find which one works best for you. I particularly like GLM-5 for implementation – it is fast, does not do too many non-sensical things and generally produces reasonable code following the instructions (not always).

Iterate, Iterate, Iterate:

If there is one thing I hope to pass on to anyone who wants to use these agents and tools effectively, it is to work towards the program and feature you’re building in small, highly managed and monitored iterative steps. I have found this to be the most effective approach and I can get good results developing a complex feature making sure it’s done slowly and carefully in small steps.

The agent can go fast. Too fast. The goal in my opinion with these tools is to get them to slow down. To get yourself to slow down. In the end, as the saying goes, you need to “go slow to go fast”. Trying to “vibe code”, or “one-shot” the implementation of a feature in steps that are too big and letting the agent go while you walk away, in my experience will get you bad results and in the end will slow you down when the product and software is bug-ridden, does not follow good maintainable software design and just doesn’t work as you intended.

  • Use good software design principles and keep the code clean, readable and maintainable just as you would if writing it yourself.

I also want to stress this. Don’t let the agent write bad code. It will, and it will bite you in the end. If the code is developed with the agent in very small iterative steps, stopping after each to check quality and actual behavior, then you’ll be in much better shape.

I stop after every small change and review every line of code the agent wrote. I make sure the agent writes tests covering observable behavior for every change made along the way. I make sure the tests make sense and pass before moving on to the next small step. I make sure the names the agent chose make sense, are descriptive and are easy to understand expressing intent clearly. I make sure I understand the code and know what it’s doing.

Don’t let the agent bloat the codebase with poor implementation choices. Check the names it chooses, check the decisions it’s making and correct and guide them along the way. This has kept me out of trouble and when I look at the software produced, I can be proud of it and would be able to debug or update it myself in the future if I wanted to.

How to talk to LLMs which the agents use:
    • Use Markdown files (.md)

There are conventions, including an open standard for Skills developed by Anthropic which is worth reviewing, but generally I create markdown files in strict markdown format (similar to how a standard project on GitHub has a README.md file), and then make sure the agent has them in their context window. Some markdown files are read-only, like coding conventions and instructions. (In Aider, for example you can add read-only files to the context with the /read command).

So I will have a Markdown file containing the Project Goal and vision for the program. A Markdown file for a feature I want to plan out and implement. A Markdown file with Coding Conventions I want the agent to follow. The agent can only read some of these files, or can edit others like the feature planning document. It’s important to keep in mind that an agent may not remember all the things you write in these, but the files serve as a good “reminder” or loose guidelines which the agent will sometimes follow (this is just due to the probabilistic non-deterministic nature of these systems).

Make sure you include EXAMPLES for the agent. See the examples provided for what a good comment looks like and a bad comment looks like HERE.

  • Nudge it in the right direction within it’s Corpus.

LLMs have a “Corpus” which is the library of text it has been trained on. This Corpus, under the hood, is basically numbers spread out in “vector space” which means it’s like putting words and text on a graph. Related words are closer together, non-related words and contexts further apart in the space. You want to try to get the LLM to get into the right “space” in the graph to get better results.

So if you wanted the LLM to correctly guess “How are you?” in the following scenario, instead of asking:

“Complete the following sentence: ‘How are ____’,”,

what would get a more predictable result would be to “nudge” it towards the right space in the Corpus by saying,

“Complete the following greeting: ‘How are ___'”.

Using “greeting” instead of “sentence” nudges the LLM to look in the space where text related to greetings are, which will much more likely give you the result you were looking for. Keep this in mind when asking the agent about the code in the project or asking it to make updates to the program.

Some other general tips:

  • Have the agent write tests and run them after every change. Check the tests and make sure they cover behavior and make sense. Also use a test coverage tool and get the agent to write more tests for modules with low coverage.
  • Use linting tools on the codebase and give the errors to the agent to fix, keeping the code in tip top shape along the way.
  • Instruct the agent to use type annotations if you are working with a non static-ly typed language like Python.
  • Use a Cyclomatic Complexity checker (like radon with Python) which will measure how much nesting and branching there is in your functions with a score. Give the functions with the highest score to the agent and ask it to refactor to reduce the complexity score. This keeps the codebase lean and clean and not a mess of if/else conditionals or nasty switch statements.
  • Periodically clear your context window and start over. This helps with a couple things:
    • 1) Compaction – the window is cleared automatically when it grows very large to save space, but that will result in the LLM getting confused all of the sudden with missing context it had before compaction took place.
    • 2) As context gets larger and larger, there is more of a chance that the LLM will make “too many connections” in the giant wall of text and words, potentially producing convoluted or non-useful answers and responses.

Usage Examples

These are actual examples to show how I worked with the coding agents developing a Python program that accepts a series of one or more groups of tone frequencies (akin to musical phrases or melodies) as input and runs them though a functional pipeline to get a transformed version of the musical composition at the end. The program was not trivial – it was designed to handle:

  • both monophonic and polyphonic voices in a composition
  • application of transforms to one or more targeted voices, phrases or the entire score
  • a variety of complicated transforms involving stochastic side effects among other things (I really tried to get creative with the transformation algorithms, which was a big part of the fun developing this)

I used the agents to first plan out product goals, features and implementation steps (in an iterative fashion!), and then had a model implement the changes in small steps with constant checkpoints at each step to verify and review changes.

This iterative progress with constant checks and reviews produced very good results with the end product being a functional program that did exactly what I wanted it to, and also wasn’t a hot mess.

I provided the agent with some markdown files, for example a CONVENTIONS.md file, which reminded the agent of good software design principles I wanted it to follow.

Planning a Feature:

planning-a-feature-example
Using the agent to brainstorm planning a feature for the program.

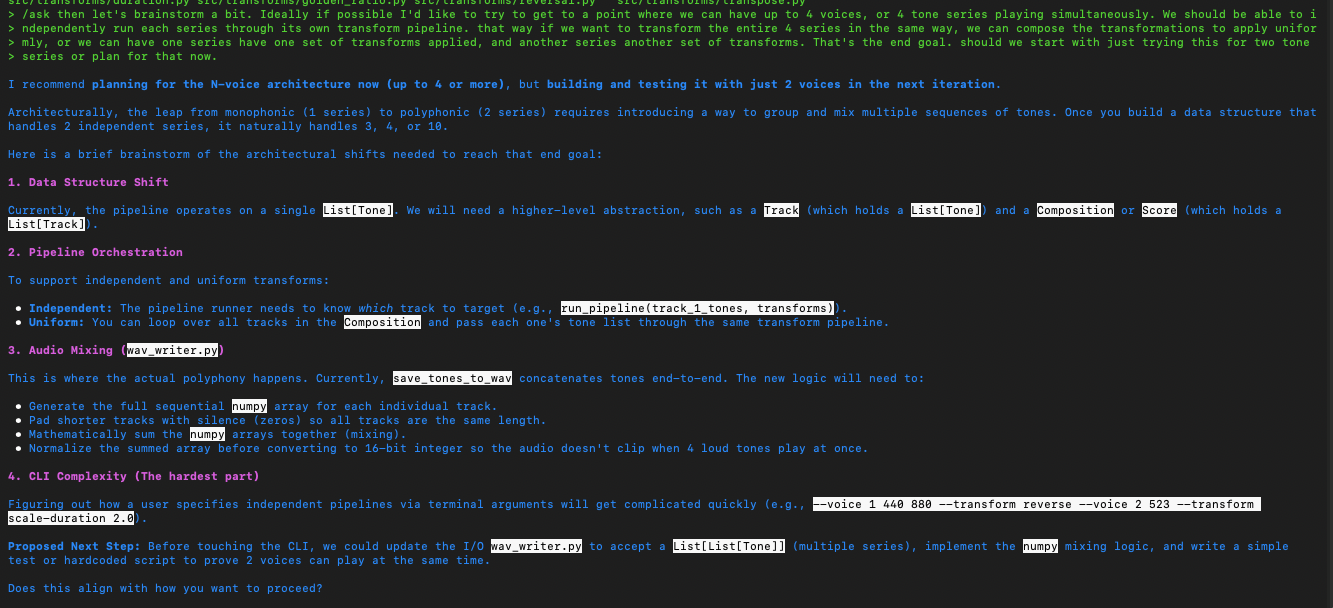
The above exchange has the agent recommending a “Track” data structure as a domain object abstraction representing a phrase in a group of polyphonic phrases. We went with that initially and later as we continued to iterate, eventually wound up with a “Voice” abstraction instead which is following the Domain Driven Design idea of ubiquitous language matching terms of the domain (musical composition in this case). I’m just pointing that out because, this process unfolds just like real software development – in iterations, in sprints, in constantly adjusting course as the design unfolds and is discovered by iterating towards it! Again, forget about “one shot”-ing anything. That is just not how real-life development of sophisticated systems works.

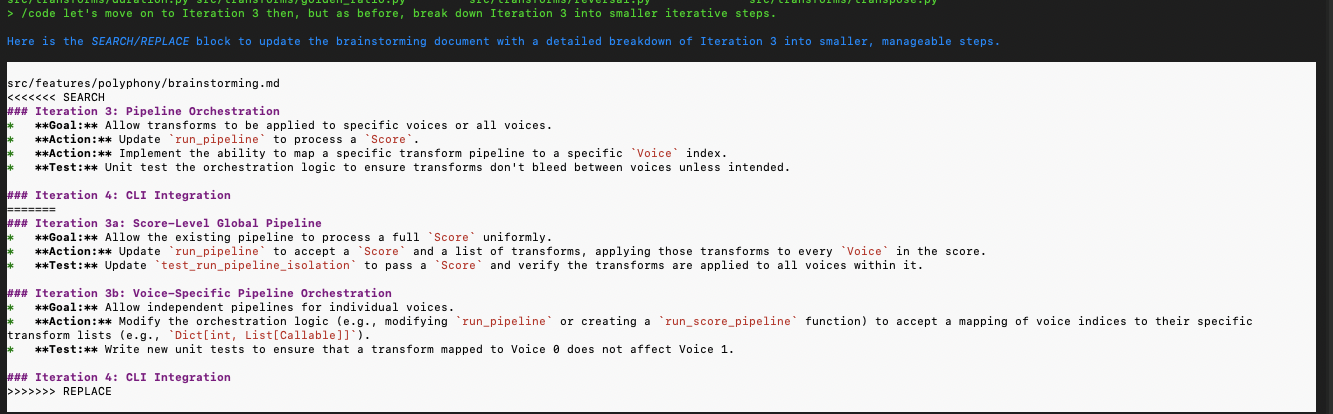
Breaking down the steps into further smaller iterative steps (I highly recommend this approach – in a fractal fashion, continue to break down steps recursively):

break-down-further
Break down the plan even further so that the steps are even smaller and iterative.

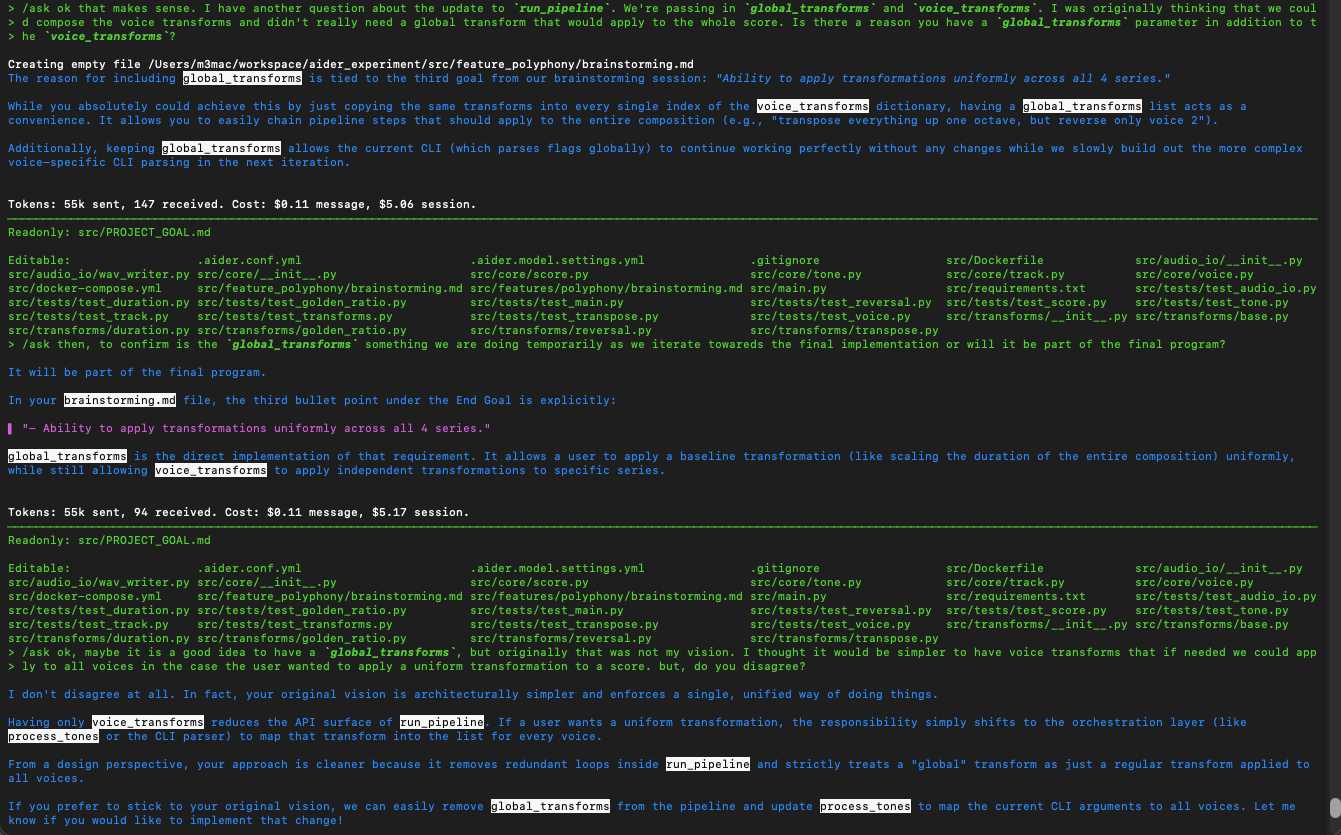
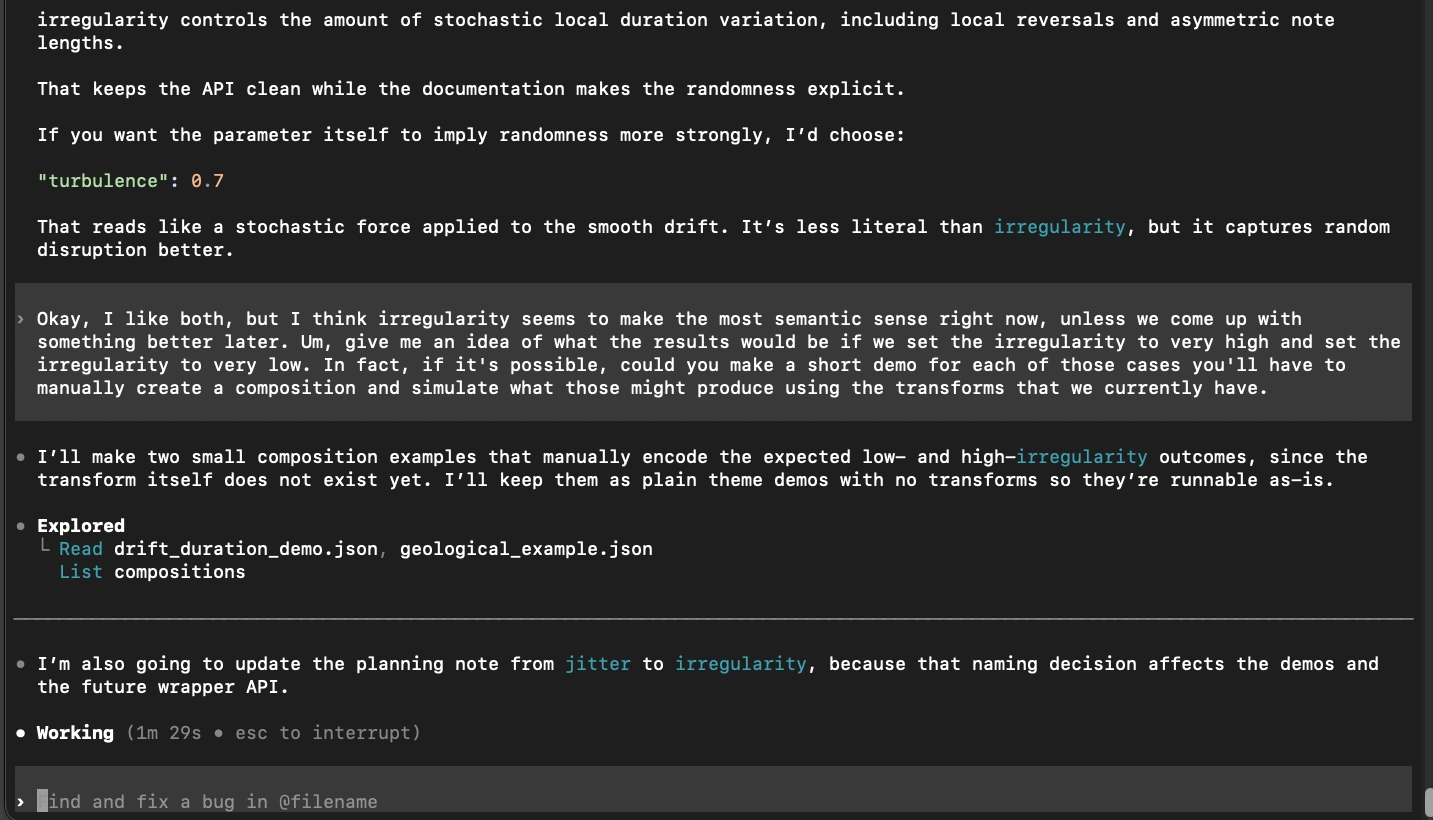
Back and forth brainstorming and using the agent as a pair to flesh out a simpler implementation (it makes for a great rubber duck!):

brainstorming-with-agent
A back and forth with the agent further fleshing out implementation details.

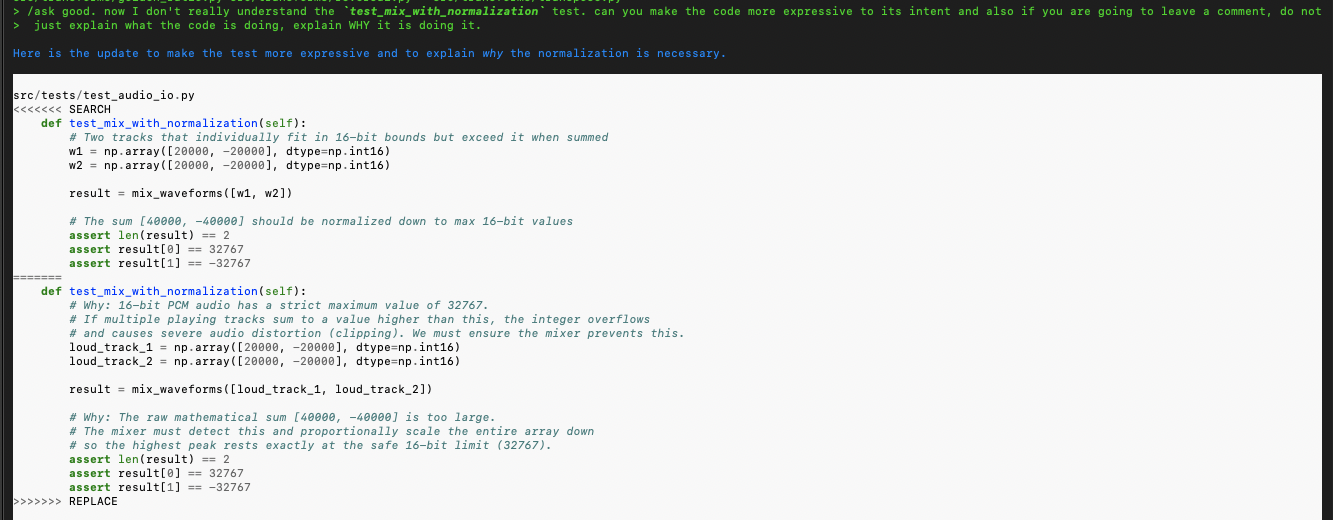
Implementation refactoring and guidance on comments (note how the agent did NOT follow instructions in the CONVENTIONS.md file about comments and I have to remind it):

refactor-guidance-comments
Guiding the agent to use comments to explain WHY the code does what it does.

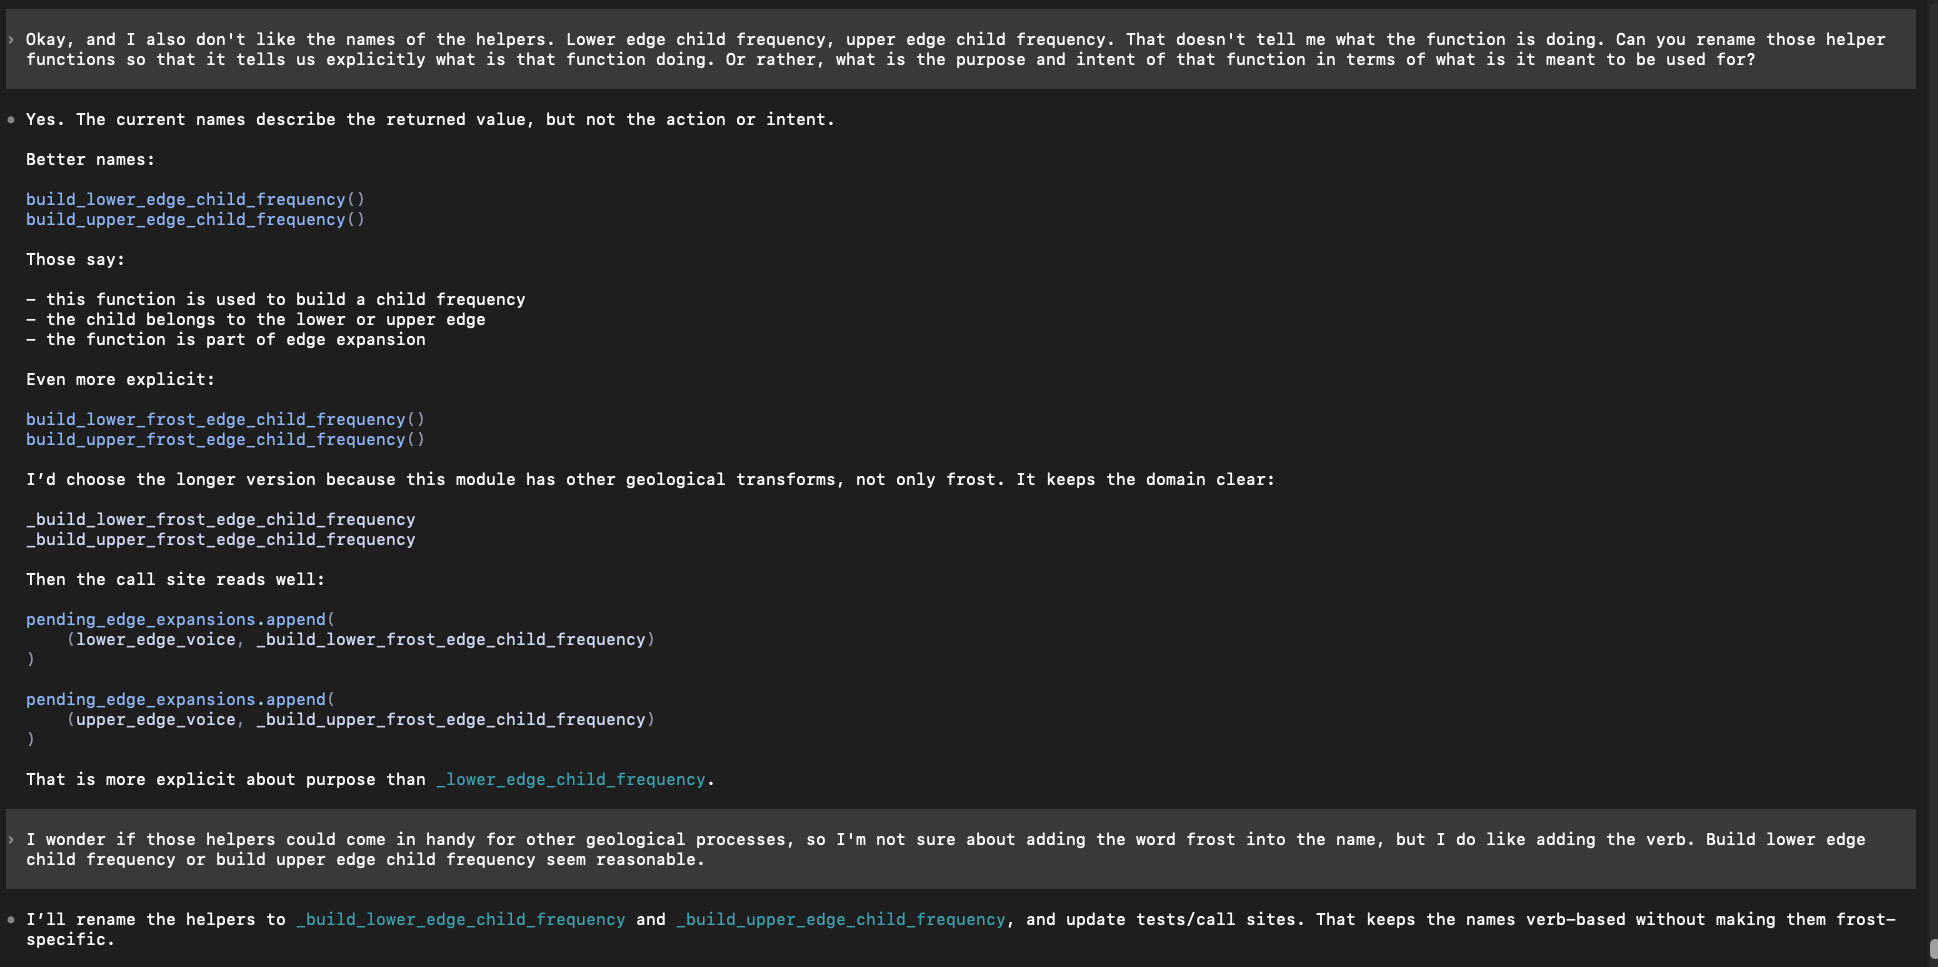
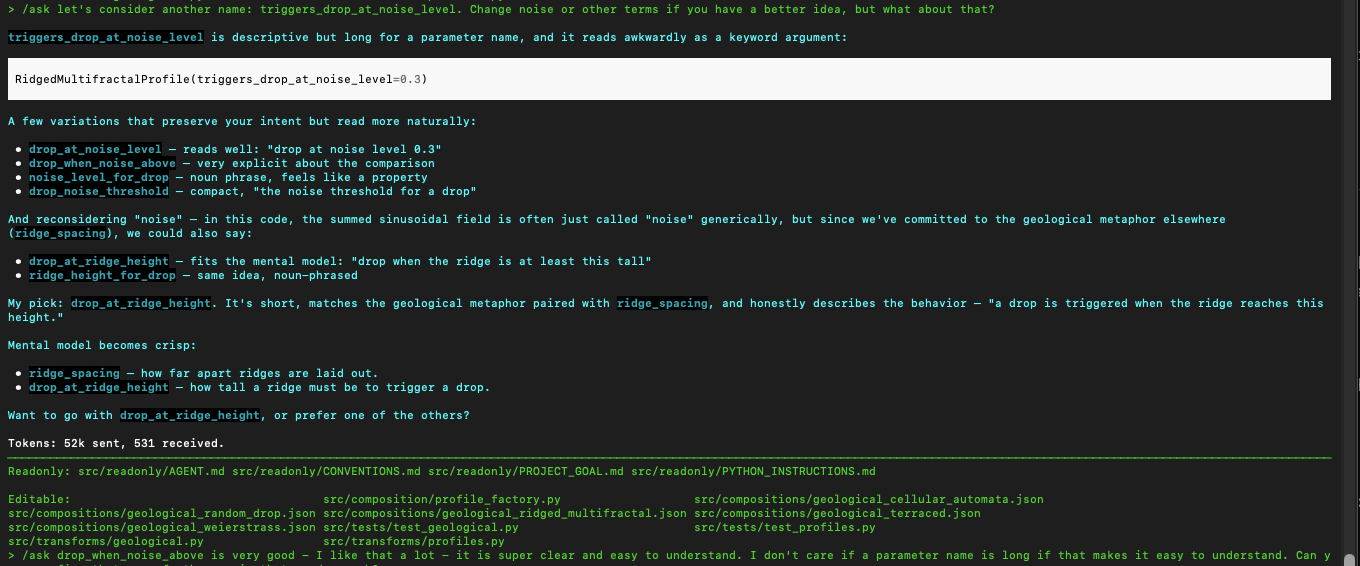
Now this is with Codex (the above was Aider). I’m now telling the agent working on the same codebase that I want the names of functions to be different and more expressive. This is a great example of how you, the Software Engineer, need to bring your good instincts and guidance into the picture constantly to direct the agent:

naming-updates-with-agent
Asking the agent to brainstorm and consider renaming some elements to make them more expressive and clear.

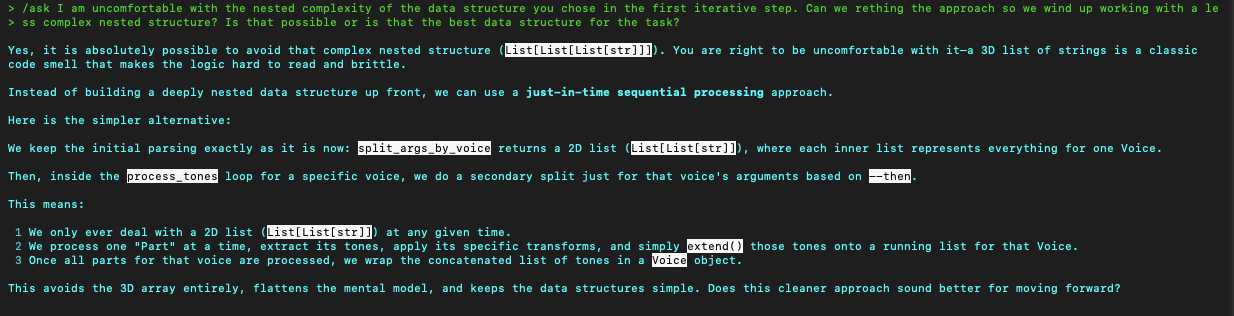
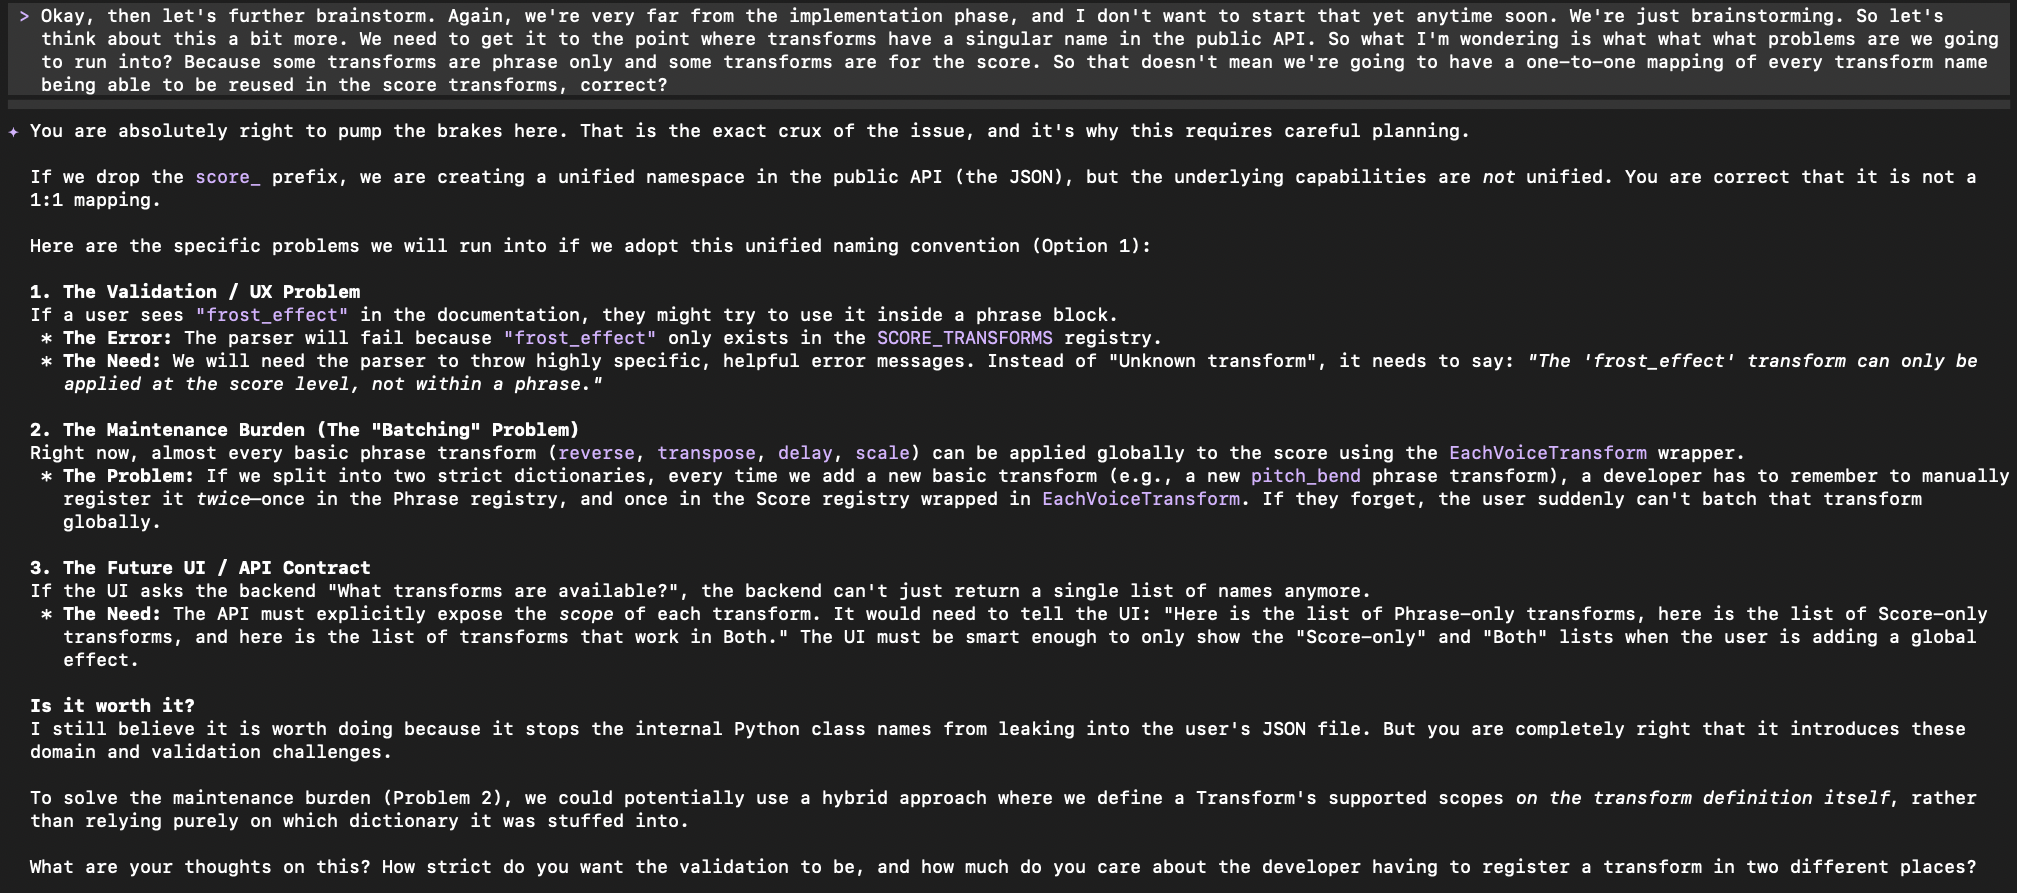
This is a good example of reigning the agent in and preventing the inevitable bloat and over-engineered complexity it will try to introduce. I’m working with it to reduce the complexity of a proposed Data Structure to keep the program simple as possible. Note that its response then must be evaluated by you, the real software engineer, using your judgement and experience to determine if the change is a good idea and truly an improvement or not.

reduce-complex-data-structure
Working with the agent to reduce and manage complexity given it produced an overly nested data structure.

These are also some things you have to watch for – the agent just doing nonsensical things like here where it made an unnecessary and redundant assignment with phrase_transform = transform-function . That is just adding bloat, so I asked it afterwords to undo that change and just use transform_function directly.

bloat-agent-added
Watch out for unnecessary assignments and nonsensical decisions by the agent – you need to correct them as you go.
aider-naming-example
Working with Aider to get a better name

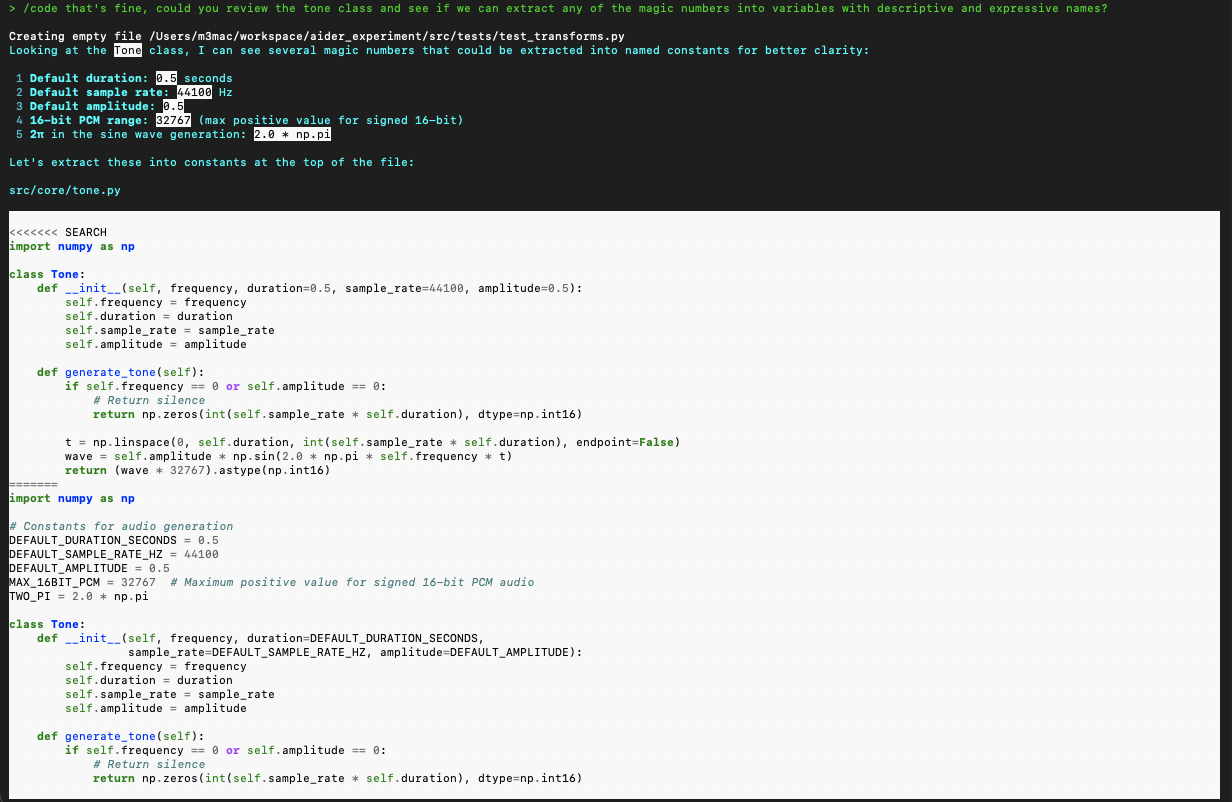
The agent might (probably will) write magic strings and magic numbers all over the place. Here I’m catching them and asking Aider to do the right thing:

magic-numbers-strings-with-aider
Telling Aider to extract magic numbers and strings to expressive variables so the intent of them is clear.

You can ask the agent to produce output or some kind of material as a checkpoint. I recommend doing this regularly to make sure the program is behaving as expected:

checkpoint-output
Using the agent to generate output to make sure the program is producing what you expect it to. Akin to a smoke test.

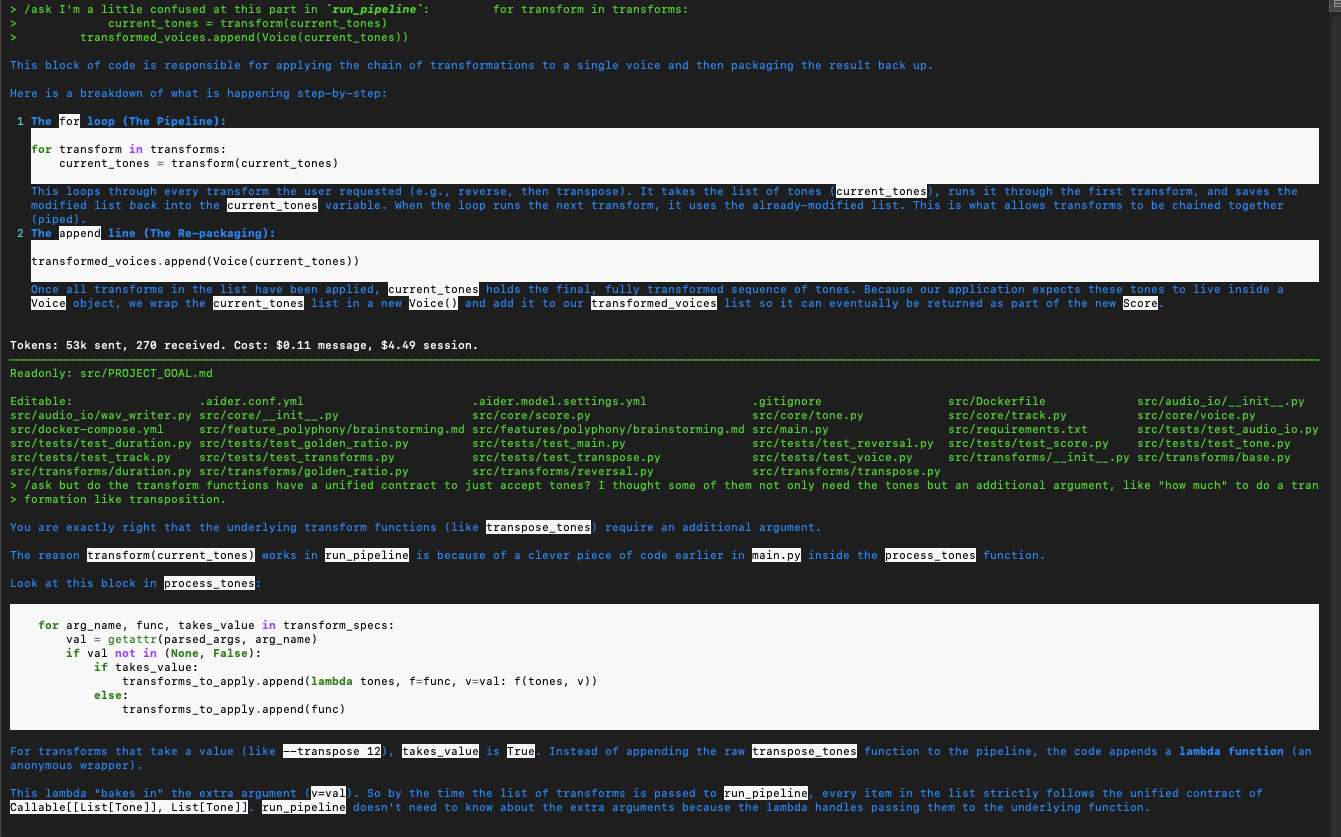
Using the agent to clarify the code. I want to understand the code being produced and read it, every line. Besides just reading it, I can also ask the agent to explain and break down the code if I still have questions to clarify any misunderstanding. Here the agent reminds me that a previous update introduced a closure which bakes in an argument that I thought was missing in the pipeline at that point.
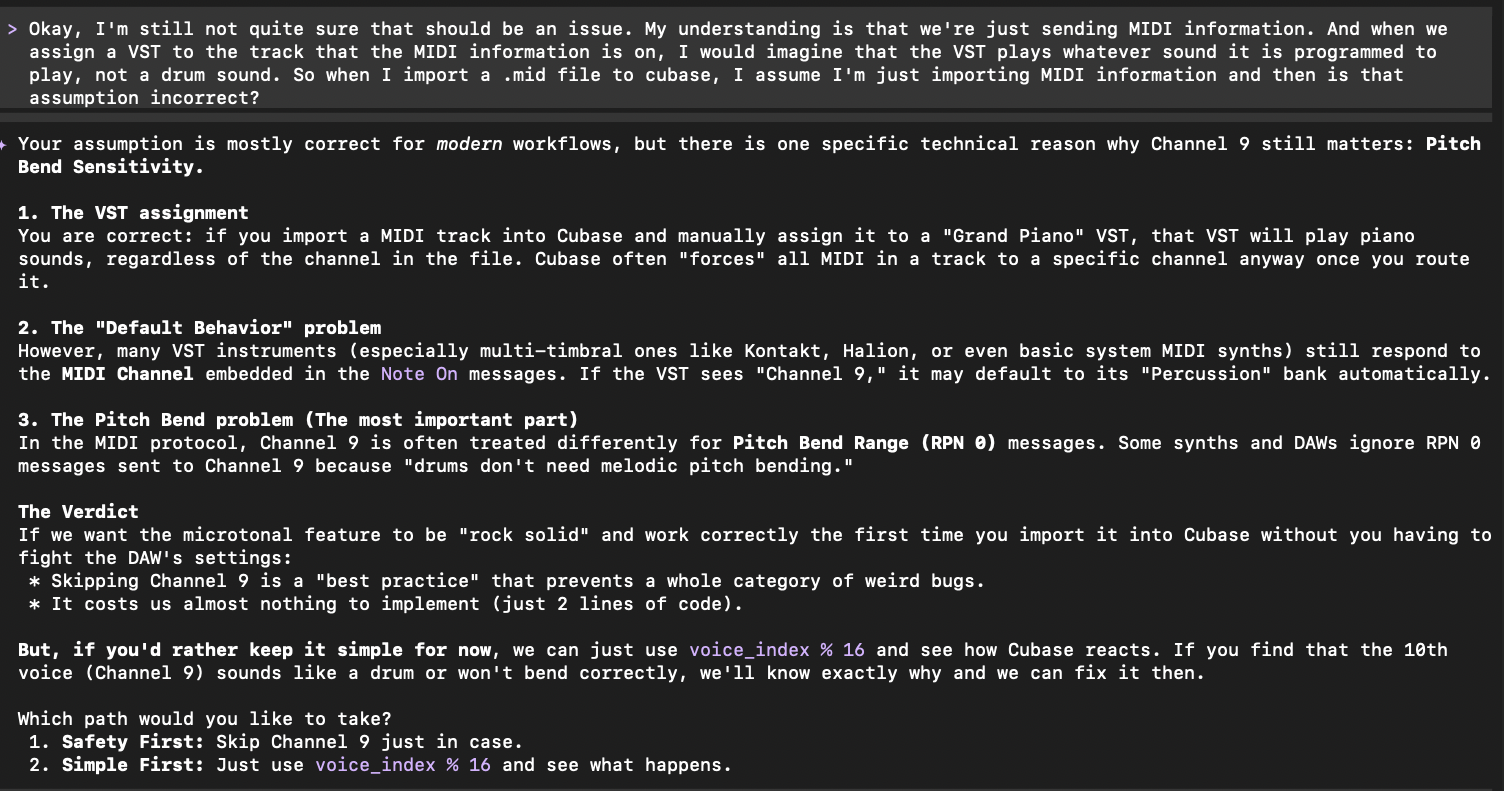
explaining-code
Asking the agent to further clarify the code to make sure I’m understanding it.

Managing Spend and Cost

  • Tokens are expensive. Most of the companies offering the LLMs charge by the token, particularly if you are using API Keys and pay-as-you-go plans. I would recommend looking at purchasing subscription plans which are a flat rate and prevent the mounting cost of sending more and more tokens on a pay-as-you-go plan. OpenAI Plus, for example is a subscription that allows using Codex. You do have to keep in mind usage limits and rate limiting, but so far it hasn’t been a huge issue with Codex for me.
  • AWS Bedrock: You can also consider using services like this one AWS offers which might give you access to more cheaper models compared to what the big A.I. companies like Google, Anthropic or OpenAI offer.
  • Lastly, I would caution against “too good to be true” deals. I have seen some recommendations for services that offer “free” Frontier-level model usage, but my understanding is that if you use a free model, you are agreeing to have that company intake your data and lose privacy or control over what is sent and used to train the model or retained on accessible servers.

Final Thoughts

There is a public stigma and general negative sentiment about A.I. currently. This is due to the belief that this technology will be able to replace people and put them out of work. This has become a concern among some in the software industry as well.

Having used “A.I.” now both professionally and for personal projects, in my opinion this fear is unjustified. While I wasn’t sure at first, now having tested out coding agents, I am excited about this new technology and think it can be used as a tool to leverage, making my job easier, less tedious and I think the agents are fun to use.

And to be clear, these are TOOLS, meant to be used by people, which can maybe make our lives a bit better. I think you NEED people for these tools to be useful at all in the first place.

One thing that struck me during this learning process was how much I had to monitor, correct and guide the agent.  It was nonstop – I could not just get up and walk away for any significant period of time. This means the agent and myself did not produce “2X” the work (forget “10X”). I think with the agent I produced the same amount of work, it just cut out some of the tedium like typing and syntax issues, and helped me with some domain-specific knowledge and high level math.

I still had to design the software, think about how the functions and components related to each other, manage and decide on boundaries and abstraction levels, figure out good architecture, think about tradeoffs and change course as needed along the way as iterations unfolded – all the stuff that’s still really hard in software, was still really hard using the agent.

The future is unknown, but based on my experience so far diving into actually using these agents to see what all the buzz is about, these are the conclusions I’ve come to.

Further Resources

  • Andrej Karpathy Neural Network YouTube Series – a great series on YouTube (free!) which walks you through implementing a neural network with Python from scratch. It is a great resource for getting some understanding of the main mechanical, technical and mathematical techniques fundamental to how these systems work.
  • AI Coding Agent GitHub repo – My repo with a small setup of Aider with Docker Sandbox for reference.
  • Anthony Alicea free first hour of A.I. course – This is the first hour of the A.I. Assisted Development course recommended as a good starting resource. Besides being a sample of the course, it explains a great high-level mental model and framework for how to view and think about LLMs and how they work under the hood.

AWS CDK Custom Resources: Parsing Synth-time JSON

In a previous blog post I covered a basic overview of Custom Resources in AWS Cloud Development Kit (CDK) and in keeping with the same theme, I ran into a scenario which I thought would be more straightforward than it actually was: parsing a response containing a JSON object from a Lambda backed Custom Resource.

The problematic context was using a Custom Resource to fetch a secret from Parameter Store which was a JSON object. This object contained some setting and configuration details for AWS resources being deployed in a CDK Stack.  I thought I could simply create a Lambda backed Custom Resource which fetched the secret and returned it, so I could use it in the Stack and pass it to the resources which required that information. It turned out that it  was not so simple.

The Problem:

When you deploy your infrastructure with CDK and need to reference data stored in AWS Parameter Store, for instance, you cannot get direct access to the data in raw form at runtime. This is called “synthesis time” in CDK speak and it means that when you run a deployment, CDK synthesizes an AWS CoudFormation template (a YAML file) for the desired state of your infra with placeholder tokens for pieces of data which are not resolved until later in the physical resource creation process.

The two hurdles to get over were, as mentioned:

  • The value retrieved at synthesis time during deployment was an unresolved token, not the actual secret value.
  • The configuration stored in Parameter Store was not a simple string. It was in the form of a JSON object, and I needed to dig into the object to access specific properties off of it.

This meant that I could not leverage code constructs such as built-in parsing APIs for JSON or simple dot notation for property access with JavaScript, or easily work with in-memory data in an object type form as you normally would when writing application code.

The Solution:

CDK comes with AWS CloudFormation’s Intrinsic Functions, which you can use to work with and parse these unresolved placeholder tokens at synthesis time as if they were the resolved actual values at resource creation time.

In particular, the functions to use are cdk.Fn.split and cdk.Fn.select, which can be used to split the JSON string and select the value. This may not be the most elegant or robust way to handle parsing unresolved objects at synthesis time, but it worked, is practical and saved me further lost time exploring other solutions which just didn’t wind up working out (such as building a custom Lambda to use with a non pre-baked standard Custom Resource which parses and returns the object).

I also used the built-in Custom Resource AwsCustomConstruct constructs provided by CDK to fetch the parameter from Parameter Store.  What’s great about these built-in Custom Resources, is that you don’t have to create a Lambda, manage dependencies, or write any custom logic to accomplish common use case tasks. The pre-built Custom Resource is automatically backed by a Lambda or functionality to accomplish a given action (in this case, ‘getParameter’ to retrieve a parameter from AWS Parameter Store).  This saves you extra overhead and reduces moving parts in your IaC code.

In case it is helpful to others running into the problem, the code for the approach is below (using this example from the AWS CDK documentation as a reference):

As an example, the kind of data I was storing and retrieving from Parameter Store was something like:

{ "prop1": "prop1Value",  "prop2": "prop2value" }
// cdkProject/lib/myStack.ts

import * as cr from "aws-cdk-lib/custom-resources";

const JSON_PARAM_NAME = "/myapp/secrets/jsonsecret";

// Using the built-in AwsCustomResource construct with the action "getParameter":
    const getParameter = new cr.AwsCustomResource(this, "GetParameter", {
      onUpdate: {
        service: "SSM",
        action: "getParameter",
        parameters: {
          Name: JSON_PARAM_NAME,
          WithDecryption: true,  // Needed for SecureString parameters
        },
        physicalResourceId: cr.PhysicalResourceId.of(Date.now().toString()), // Forces fetch to parameter store on each deploy
      },
      policy: cr.AwsCustomResourcePolicy.fromSdkCalls({
        resources: [
    `arn:aws:ssm:${cdk.Aws.REGION}:${cdk.Aws.ACCOUNT_ID}:parameter${JSON_PARAM_NAME}`,
        ],
      }),
    });
// Parameter Store values are by default available on the Parameter.Value property of the response from SSM:
const paramValue = getParameter.getResponseField("Parameter.Value");

// Here we need to use intrinsic functions to dig into the future resolved actual value of the retrieved secret (which is a placeholder token at synth time):
    const prop1Split = cdk.Fn.split('"prop1"', paramValue);
    const afterKeyPart = cdk.Fn.select(1, prop1Split);  // Part after "prop1" key
    const afterColon = cdk.Fn.split(':', afterKeyPart);
    // the value part after the colon
    const valuePart = cdk.Fn.select(1, afterColon);
    const valueSplit = cdk.Fn.split('"', valuePart);
    const prop1Value = cdk.Fn.select(1, valueSplit); // First split part is the value for the property

    new cdk.CfnOutput(this, "TheParamValue", {
      value: prop1Value,
      description: "Parsed value from the custom resource",
    });

After implementing the use of Instrinsic Functions and leveraging the built-in Custom Resource Action CDK provides for fetching data from AWS Parameter Store, I was able to successfully retrieve and insert the important piece of configuration needed for my Resources.

If there are more robust ways to handle JSON object like pieces of data in a context like this, please feel free to leave suggestions in the comments, but this turned out to be a working solution that enabled me to move forward and deploy my properly configured infrastructure.

Understanding Custom Resources in AWS CDK

A Brief Introduction: AWS CDK

AWS Cloud Development Kit (CDK) is an open source Infrastructure as Code tool recommended and maintained by AWS to manage cloud infrastructure via code. It offers management using languages such as JavaScript, TypeScript, Python, C#, GoLang and Java which means you can take advantage of code constructs such as loops, variables and conditionals to orchestrate how your infrastructure such as EC2 instances, S3 Buckets, RDS instances and other AWS resources are managed, updated and deployed.

What is Infrastructure as Code?

IaC (Infra as Code) is an approach to managing resources needed to host and run your application or website using actual written code instead of, for example, manually ssh’ing into your web servers or logging into your Cloud console UI to turn buttons and knobs or do administration manually. It’s a modern, robust and more automated way to reduce user errors when doing this kind of manual maintenance or updating of your software infrastructure.

Traditionally, IaC management in AWS was done directly with AWS CloudFormation, which leverages YAML files and syntax. While this was a viable option, it could also be quite verbose, complicated and overwhelming with very large YAML files and a large array of properties and settings to memorize or look up.

AWS CDK actually still uses CloudFormation under the hood, but it abstracts the details and complexity away allowing you to use code in a variety of languages. The library comes with helper functions that encapsulate things like adding Allow IAM permissions to resources in one line of code, instead of having to construct a more complex and verbose YAML block, for instance.

Custom Resources

This brings us to the topic of this post which is a construct in AWS CDK called a Custom Resource. A Custom Resource is an entity in AWS CloudFormation which could be used to extend “out of the box” functionality available conventionally.  For example, if you needed to run some logic or encapsulate an infrastructure operation that didn’t come “out of the box” with a Resource in CloudFormation, you could use a Custom Resource to combine available Resources or run custom logic as part of your deployment process.

What is a Resource?

Here, we’re talking about logical resources, which means a resource that represents a physical one – for example, an AWS::EC2::Instance resource in CloudFormation is a representation of an actual EC2 instance that would be deployed into your AWS account’s VPC.  AWS CDK uses an abstraction called a Construct, which can represent a CloudFormation Logical Resource, but is a simpler object to deal with, coming with member functions and built in helpers to accomplish common infra management tasks that normally would be more cumbersome to implement in raw CloudFormation YAML templates.

With the background and terminology out of the way, now let’s understand why and when to use Custom Resources in CDK.

Let’s say you want to update a list of email addresses for a subscription to an AWS SNS topic, so that when you run a deployment, a list of emails is checked against to determine what set of users receive notifications or emails from the SNS topic when a message is published.

There is not a built in Resource to accomplish this, so you can make a Custom Resource backed by a AWS Lambda (a small serverless function) which could reach out to a data store (AWS Parameter Store, for instance), retrieve a list of emails and create a subscription in SNS for the emails when you release or update your application infrastructure. This would automate manual maintenance or updates to the SNS subscriptions where you’d otherwise have to login to AWS console, go through the steps in the SNS topics UI and start typing in email addresses and creating subscriptions manually.

A Concrete Example:

Implementing the above scenario, this could be the Lambda which you can define in your project (and commit to a repo for version tracking with git). It uses the AWS SNS client library and the SSM client library to communicate with Parameter Store to retrieve a list of stored emails and create an SNS subscription to a topic for them. This example will focus on the code to define and add the Custom Resource with the Lambda and assumes the other constructs such as your SNS topic have already been defined and created.

In the Lambda, note that you need to send a pre-determined and required response structure from the Lambda to let CloudFormation/CDK know that the Lambda completed (either successfully or otherwise). This is what the sendResponse  function does. Without it, CloudFormation/CDK will not know that the Lambda is done doing what it needs to do and will time out and Fail the deployment.

// someLambdaFolder/index.js
const { SNSClient, SubscribeCommand } = require("@aws-sdk/client-sns");
const { SSMClient, GetParameterCommand } = require("@aws-sdk/client-ssm");
const https = require("https");
const snsClient = new SNSClient({ region: process.env.AWS_REGION });
const ssmClient = new SSMClient({ region: process.env.AWS_REGION });

function sendResponse(
  event,
  context,
  responseStatus,
  responseData,
  physicalResourceId
) {

  return new Promise((resolve, reject) => {
    const responseBody = JSON.stringify({
      Status: responseStatus,
      Reason: `See CloudWatch Log Stream: ${context.logStreamName}`,
      PhysicalResourceId: physicalResourceId || context.logStreamName,
      StackId: event.StackId,
      RequestId: event.RequestId,
      LogicalResourceId: event.LogicalResourceId,
      Data: responseData,
    });

    const responseUrl = new URL(event.ResponseURL);

    const options = {
      hostname: responseUrl.hostname,
      port: 443,
      path: responseUrl.pathname + responseUrl.search,
      method: "PUT",
      headers: {
        "content-type": "",
        "content-length": Buffer.byteLength(responseBody),
      },
    };

    const req = https.request(options, (res) => {
      console.log("Status code:", res.statusCode);
      resolve();

    });

    req.on("error", (error) => {
      console.error("sendResponse Error:", error);
      reject(error);
    });

    req.write(responseBody);
    req.end();
  });

}

exports.handler = async (event, context) => {
  console.log("Event:", JSON.stringify(event));

  try {
    if (event.RequestType === "Delete") {
      // No action needed on delete
      await sendResponse(event, context, "SUCCESS", {}, PhysicalResourceId);

      return;
    }

    // Passed in via properties on the custom resource

    const { EmailsParamName, TopicArn, PhysicalResourceId } = event.ResourceProperties;
    const ssmResult = await ssmClient.send(
      new GetParameterCommand({ Name: EmailsParamName })
    );

    const emailsRaw = ssmResult.Parameter.Value;

    const emails = emailsRaw
      .split(",")
      .map((e) => e.trim())
      .filter((e) => e);

    console.log("Parsed emails:", emails);

    for (const email of emails) {
      await snsClient.send(
        new SubscribeCommand({
          Protocol: "email",
          TopicArn: TopicArn,
          Endpoint: email,
          ReturnSubscriptionArn: true,
        })
      );

      console.log(`Subscribed ${email} to ${TopicArn}`);
    }
    await sendResponse(event, context, "SUCCESS", {}, PhysicalResourceId);
  } catch (error) {
    console.error(error);
    await sendResponse(event, context, "FAILED", { Error: error.message }, PhysicalResourceId);
  }
};
// someLambdaFolder/package.json

{
  "name": "lambda",
  "version": "1.0.0",
  "description": "",
  "main": "index.js",
  "scripts": {
    "test": "echo \"Error: no test specified\" && exit 1"
  },
  "keywords": [],
  "author": "",
  "license": "ISC",
  "dependencies": {
    "@aws-sdk/client-sns": "^3.810.0",
    "@aws-sdk/client-ssm": "^3.810.0"
  }
}

Now for the CDK implementation, you’d create a Lambda resource, and add permissions required to accomplish the task of communicating with Parameter Store (SSM) and the AWS SNS service:

// projectRoot/lib/stacks/someStack.ts

import { NodejsFunction } from "aws-cdk-lib/aws-lambda-nodejs"; // Use NodejsFuction construct to get auto-installed npm dependencies
import * as cr from "aws-cdk-lib/custom-resources";
  const subscriptionHandler = new NodejsFunction(
    this,
    "SnsSubscriptionHandlerLambda",
    {
      runtime: lambda.Runtime.NODEJS_20_X,
      handler: "handler", // Name of the exported function in index.js
      entry: path.join(lambdaPath, "someLambdaFolder", "index.js"), // point to where you define the lambda and logic in your project
      timeout: cdk.Duration.seconds(300),
      bundling: {
        externalModules: [], // Specifying this as an empty array includes all packages listed in the lambda folder's package.json and installs them when deployed. include a package-lock.json in the lambda folder if you want consistent versions
        minify: true, // Minify the code to reduce bundle size
      },
    }
  );
    // Grant Lambda permission to read SSM param & manage SNS subscriptions
    subscriptionHandler.addToRolePolicy(
      new iam.PolicyStatement({
        actions: ["ssm:GetParameter", "sns:Subscribe"],
        resources: [ `arn:aws:ssm:${cdk.Aws.REGION}:${cdk.Aws.ACCOUNT_ID}:parameter${cwEmailsParamName}`,
          alarmTopic.topicArn,
        ],
      })
    );

    // Grant CloudFormation permission to invoke the Lambda
    subscriptionHandler.addPermission("AllowCloudFormationInvoke", {
      principal: new iam.ServicePrincipal("cloudformation.amazonaws.com"),
      action: "lambda:InvokeFunction",
      sourceArn: cdk.Stack.of(this).stackId, // Get stackId from the parent stack
    });

Note, that you should generally use the NodejsFunction construct from `aws-cdk-lib/aws-lambda-nodejs` in CDK, which provides options to automatically bundle and install npm dependencies for you. Otherwise, you’d have to npm install them manually before deploying if using another Lambda construct. You would create a package.json file in the same folder as your Lambda definition file which CDK would pick up automatically and the dependencies defined in that file would be installed when deploying the Custom Resource Lambda.

Finally, you need two further elements to complete the Lambda backed Custom Resource implementation: a Provider, and a Custom Resource construct.

const provider = new cr.Provider(this, "SnsSubscriptionProvider", {
      onEventHandler: subscriptionHandler,
    });

    new cdk.CustomResource(this, "SnsSubscriptionResource", {
      serviceToken: provider.serviceToken,      
    // This is what is passed to the Lambda on invocation as arguments:
    properties: {
        EmailsParamName: cwEmailsParamName,
        TopicArn: alarmTopic.topicArn,
        // Ensures that the function is invoked on every deployment:
        PhysicalResourceId: cr.PhysicalResourceId.of(Date.now().toString())
      },
    });

The Provider construct is a wrapper that encapsulates and extends the Lambda resource construct you created so that you can use it as a backing for the Custom Resource (for example, it exposes a service token which is a unique Identifier/ARN for the Lambda which must be provided to identify which Lambda resource is to be invoked).

A key thing to remember is that the Lambda/Custom Resource is not invoked if none of the properties change, even if you update the code in the Lambda index.js (index.ts) file!  For that reason, adding a dynamically changing unique value such as Date.now().toString() or some kind of “Version” property which increments monotonically will ensure a re-invocation of the Lambda on every deployment if you need to act on fresh and changing data.

That’s Custom Resources in a nutshell. I thought it would be a good topic to cover and try to boil down into a brief post in case it helps others get a quick distilled overview of them and when they are useful.

Unit Testing In a Nutshell

Over the last several months I have been taking a deeper dive into software testing best practices.  Testing is a common “pain point” for a lot of developers and I’ve seen multiple projects that even have no tests at all because “it slows us down”. I’m a big believer in testing (and test driving) software to reduce bugs, enable confident refactoring and improve the design of the system.  Having no tests or poor coverage will really slow projects down in the long run. This post distills some best practices for Unit Testing and my hope is to make a case for embracing testing as a tool to help us build better software and make our lives easier, not more difficult.

Unit Testing in a Nutshell:

  • A unit test verifies a small piece of the system, runs fast and is isolated from other tests.
  • Unit tests should verify units of behavior and not just lines of code or implementation details. This makes the tests resistant to refactoring so they don’t break when implementation, but not functionality, changes in the system.
  • Unit tests can serve as documentation or a kind of Spec for the system and ideally should be written in a way that even a non-developer or business person can understand (i.e. the description of the test should describe a business scenario in plain English)
  • The purpose of unit tests are to enable sustainability of the system (to keep it from grinding to a halt due to bugs or breaking changes in the long run and to allow for refactoring and making changes with confidence)

Definitions:

  • Spec: Short for Specification. A description of what the software or system should do to satisfy stakeholders goals.
  • Unit of Behavior: A small grouping of code representing some behavior of the system. Unlike a unit of code (i.e. a single function or class), a unit of behavior can span multiple classes or objects.
  • Regression: A bug. When a feature stops working after a certain event (i.e. a code change etc.)
  • System Under Test (SUT): The part of the code in the system that is being tested. i.e. the classes, objects or functions.
  • Test Isolation: The ability for tests to run in parallel, sequentially, and in any order is called test isolation.
  • False Positive: A test that fails, but for the wrong reasons. This term can be confusing, so think of a test for the flu – if you test positive, that’s bad and means you have an illness, so here “positive” counter intuitively translates to a negative (i.e. a test failure) result.
  • False Negative: A test that passes, but for the wrong reasons. 
  • Test Double: A Mock, Stub, Spy, Dummy or Fake to mimic a dependency instead of using it directly in a test. The term comes from “Stunt Double” used in film making.  A future blog post will explore these in more detail.

What makes a good test? The properties of a good unit test:

  1. Resistant to regressions (Catches bugs.)
  2. Resistant to refactoring (The test is not brittle and will not break when code implementation, not functionality/behavior, changes.)
  3. Runs fast for rapid feedback (You should be able to keep unit tests running during development to verify changes do not break something as you’re coding.)
  4. Easy to maintain
  5. Isolated (The test can be run independently of other tests and in any sequence of order. This allows for parallel execution for faster test runs and eliminates unexpected bugs caused from shared states.)

Do not focus on achieving 100% Line Coverage, focus on coverage of Behavior and Use Cases

One of the benefits of good test coverage is to give you confidence that changes to the system (i.e. refactoring or adding features) does not break it’s desired behavior.

Focusing on achieving 100% line coverage can, counter-intuitively, actually be problematic because it forces you or your team to write tests just to achieve that benchmark, whether the tests are valuable or not. This also has the side effect of incentivizing testing implementation details making for brittle tests that will break when refactoring occurs. You will start getting more and more false positives from your tests which will reduce confidence in them.

Not only does this create extra work unnecessarily, it also makes developers hesitant to make changes and refactor because they will then need to fix a bunch of brittle tests. The code stagnates and rots over time.  Line coverage requirements are not necessarily a good idea and focusing on testing the observable behavior of the system will make for more valuable tests to cover what really matters.

Unit Tests need to run fast

You should have a fast running suite of tests that you can leave on watch mode while developing. The purpose of this is to enable you to catch bugs and breaking changes as soon as they happen. This greatly decreases debugging time because it saves you the trouble of hunting down exactly which part of the code broke something. If you have the tests running and they start failing, the part of the code that broke things was….the last change you made. This quick feedback loop will save lots of time that would otherwise be dedicated to debugging.

A Note on Naming Tests:

You should try to name your tests in such a way that a business person or domain expert would understand what the test is covering. This helps to make your test suite a documentation or spec for the system and what it’s expected functionality is. This in turn also makes the system as a whole and what it’s goals are easier to reason about and understand.

Suggestion:  Tests should verify facts about the system. You may want to consider removing words like “should” and replacing with “is”, and when naming tests in general consider making a statement as if it were a fact about the behavior of the system.  The C# testing tool XUnit, for example, actually uses [Fact] to declare a test definition.

Another suggestion is to just use plain English when naming tests instead of following a convention like: [MethodUnderTest]_[Scenario]_[ExpectedResult].
You shouldn’t use the name of the method or class in the test description because that is an implementation detail. If the function name changes, then you have to update all of the test names referencing it.

The Classical School vs. London School of Unit Testing:

There are two schools of testing: The Classical School and The London School.  There are pros and cons to each, but I prefer the Classical School style. It is advocated by industry stalwarts such as Martin Fowler and the arguments for it, in my opinion, are compelling.

Differences:
  • The London School prefers using Test Doubles for all dependencies except immutable objects vs. the Classical School which only mocks shared dependencies
  • The London School considers a unit a class or function, while The Classical School considers a unit a unit of behavior which could span multiple classes or functions.
  • The London School considers a test isolated if the class or unit is isolated completely from other classes through mocking all outside dependencies, while The Classical School considers isolation of an entire test (the unit of behavior is separate from another unit, dependencies for classes may not be mocked).

One of the main advantages of The London School of testing is that if a test fails, you know exactly where and what part of the code failed since it considers a unit to be very granular (a specific isolated class or function). The disadvantage is that more mocking makes for more fragile and brittle tests.  Since mocking everything except immutable objects, including intra-system communication, will require tests knowing more about implementation details instead of only verifying observable outcomes, they will be less resistant to refactoring.

Even though The Classical School of testing has some disadvantages like the lack of easily finding the specific failing function or class, these can be overcome by running the tests constantly to give you instant feedback when a breaking change is introduced – the source of the bug is easily found, it’s the last thing you wrote. The main advantage is that by testing observable behavior and outcomes, your tests become more resistant to refactoring, valuable and test the meaningful parts of the system.  This also provides important feedback about pieces of code that cause cascading failures across the system. The London School approach would only indicate the specific class that failed since the classes under test are completely isolated.


FURTHER READING AND RESOURCES: 

  • Unit Testing: Principles, Practices and Patterns by Vladimir Khorikov. An excellent book on best practices and approaches to Unit Testing including when and what to mock, what to test and more. This blog post was inspired by and based on ideas in this book.

BEM IN A NUTSHELL

BEM is a naming convention for CSS classes that facilitates writing clean and organized CSS.  This blog post will boil down what BEM is and how to use it in this “In a Nutshell” series entry.

BEM In a Nutshell:

  • BEM stands for Block, Element, Modifier, each of which represent the 3 parts of a class name using this convention.
  • The format for the BEM naming convention is <Block>__<Element>--<Modifier> where Block, Element and Modifier represent a part of the class name (see Definitions below).

The reason BEM is a useful naming method is because it explicitly describes which element(s) your CSS rules apply to and encourages incorporating Separation of Concerns in your CSS. This makes maintaining and changing your CSS much easier to do, since making a change for one class named using BEM will not inadvertently and unexpectedly break or change the presentation of other elements.

Definitions:

  • Block: A name that describes an HTML element that can be independently moved around in the HTML document and not lose it’s meaning.
  • Element: A name that describes an HTML element that is a child or descendant of a Block element and depends on that Block element to retain it’s meaning.
  • Modifier:  A name that describes an alternate state that an element can get into. For ex., a disabled state.

BEM IN ACTION:

Let’s say you have a form that is part of a login page on your website.  We want to use BEM to construct class names for various elements to apply CSS.
The following is an example using the BEM naming convention to apply class names to the various elements:

<form class="loginForm">
     <input type="text" name="username" class="loginForm__username-input" />
     <input type="password" name="password" class="loginForm__password-input" />
     <button type="submit" class="loginForm__submit-button--disabled">Log in</button>
</form>

loginForm is the Block element class name because the form that it labels can be moved anywhere in the document and still retain it’s meaning – it is the form specifically for logging in.

The username and password inputs are not independent of the login form, so they are labeled using the Element name part in the class name.  This part is preceded by the Block they depend on (loginForm) followed by a double underscore, so they are labelled with descriptive class names such as: loginForm__username-input.

The submit button of the form starts out in a disabled state, so we add a Modifier name to the class name we will use to set the CSS for it.  The Modifier name describes the state of the element preceded by two dashes, the Element it belongs to and the Block followed by two underscores: loginForm__submit-button--disabled.


FURTHER READING AND RESOURCES: 

  • Cleancoders.com – The “Clean Code in the Browser” Series is an excellent video course which demonstrates not only how to use BEM for clean CSS, but how to apply Clean Code and SOLID principles to your HTML/CSS and JavaScript code.  This blog post was based in part on the video discussing BEM.

Data Directed Programming – A Useful Pattern

A common problem in software development is how to deal with multiple but generally similar objects that differ in some way requiring handling, processing and application behavior specific to their subtype.  After going through a free MIT lecture series taught by  Hal Abelson and  Gerald Jay Sussman on the Structure and Interpretation of Computer Programs, I came away learning a very useful software design pattern that I have used in multiple projects now to deal with this situation.

In the lectures, it is sometimes called “Data Directed Programming” or “Dispatch on Type”, which is a way of handling multiple objects that may be related and the same in some general sense, but differ slightly requiring targeted processing and handling for them.  Think of cars like Hondas, Toyotas and Fords;  They are all cars and similar in a general sense – they all have brakes, transmissions and tires etc., but you might need to take a specific make to a specialized mechanic to perform certain repairs, because the specifics (i.e. the implementation) of those components can differ requiring special knowledge in order to work on them.

In software development you will at some point inevitably run into a situation where you are dealing with objects of a general type that require different processing based on their subtype.  This usually leads to all sorts of conditional gymnastics and if/else branches that can become complicated and difficult to understand and maintain.  That’s where this pattern can come in to save the day, keep your code clean and get you out of that mess.

Data Directed Programming – The Basic Pattern:

  • Keep a table or dictionary of types that map to procedures.
  • When you call a general procedure that would apply to a series of related objects with different subtypes, use the type as a lookup to find the corresponding behavior.

Let’s try to make the pattern concrete with an example (forgive me if it’s a little contrived, but it will get the point across and you will recognize when to use this pattern in the real world).  Imagine we have a chat app and we want to process messages that have the same overall shape, but can fall into subtypes such as Private, Broadcast or Group typed messages which differ in a relatively small way and require different handling.

We want to have a single re-usable procedure (or function) that handles message processing – one that we can call when a message comes in.  Let’s see how this looks without using Data Directed Programming (we’ll use vanilla JavaScript for the examples):

// General reusable message processing procedure
const onMessageSent = (message) => {
  // check if message subtype is private and handle that specific processing:
  if (message.type === 'private') {
    ...private message specific processing
  } else if (message.type === 'broadcast') {
    ...broadcast message specific processing
  } else if (message.type === 'group') {
    ...group message specific processing
  } else { 
    throw Error('Message type not recognized.');
  }
};

Note the multiple conditional branches we need to handle the different subtypes of messages appropriately.  It’s not horrible in this contrived example, but it can quickly get out of hand in real world situations and is generally just a bad idea to have complex if/else chains if they can be avoided.  This is where our pattern helps out to eliminate that.

If we make a table and use the message subtype as a primary ID key, we can just pass in the subtype and use the procedure that maps to it directly without having to make conditional branches in our code.

// Make a table, i.e. a dictionary, with keys of message subtypes that map to specialized procedures for that type:
const processMessage = {
  private: (msg) => ...private msg processing,
  broadcast: (msg) => ...broadcast msg processing,
  group: (msg) => ...group msg processing
};

// Our general message processing handler uses the dictionary and looks up the processing we want by subtype, then calling the processing procedure:
const onMessageSent = (message) => {  
  processMessage[message.type](message);
};

As you can see, this is quite a bit cleaner and we’ve gotten rid of all those conditional branches that can be difficult to read and understand.  In my opinion,  good software design and clean code can be based on this one question: Will someone who has never seen this code before be able to understand it quickly and easily?

I can’t stress enough how useful this pattern has been in many of the applications and products I’ve worked on.  This is a common scenario that too often ends up with complicated conditional branching. Obviously you don’t want to overuse any one pattern, but I have found it works well when this common situation arises.

Further Resources:

JavaScript Quirks In a Nutshell

When I was first learning JavaScript I would come across posts about how weird (or bad) the language was, and since it was the first programming language I learned and didn’t have anything else to compare it with, I didn’t understand why some people had a negative opinion of the language.

This is an attempt to assemble  a list of those JavaScript quirks that give it a bad wrap, and were confusing to me when I was learning, as well as key concepts that are vital to understand in order to write good (i.e. working) JavaScript code.  My goal is to create a concise list that would be helpful for those learning the language to reference in order to understand some of the “weird” behavior of JavaScript, and how to use the language more effectively while not having to learn these things “the hard way”, or learning them way too late.  The list is meant to be an overview to make the student aware of these things and serve as a launching point for further exploration and research.

NOTE: This list is a work in progress and constantly expanding.  It will be updated and is under construction, so if there are other quirks or important concepts that you would like to see included that would help one write more informed and well-written JavaScript code, drop a note in the comments section.  It would be great to have a one stop shop that has as many of the quirks and confusing things about JavaScript in one place for people who are learning to have as a reference.

Table of Contents:

  • …more to come

THE CREATION AND EXECUTION PHASE:

  • When the JavaScript Engine runs in the browser, it runs in two phases – a Creation Phase and an Execution Phase.
  • A Creation Phase and Execution Phase is run every time the JavaScript for the app initially loads to create the Global Execution Context, and also runs for each successive call to any function to create that function’s Execution Context.
Terms:
  • Creation Phase:  All variable names (including the built-in this variable), objects and functions are created and stored in memory for use in the Execution Phase.  For example, on an app initialization (first load), the global window object is created and variable names, as well as functions in the code are created, stored in memory space and attached to the global window object.  A Global Execution Context is created and the this keyword is created and setup.  In addition, an outer reference to the immediately outer Execution Context is set up which allows access to variables and objects in that context (In this case there wouldn’t be an outer context, since the global context is the top most level).
  • Execution Phase:  The JavaScript code is then run and executed, line by line, without stopping or pausing.
  • Execution Context:  The environment that is created during the Creation Phase that the JavaScript code runs inside of during the Execution Phase.  It defines the variables, objects, functions and function arguments which are available and accessible, as well as the scope chain, and the this value.

*A new Execution Context is created for every function that runs in JavaScript which entails running through a Creation and Execution Phase for it, and setting up an outer reference to the immediately surrounding Execution Context which allows access to the outer context’s variables and objects (see Scope Chain below for more details). 

  • Execution Stack:  A model or data structure in the JavaScript engine which keeps track of the order of the execution of code and it’s current Execution Context.  Every time a function is called in the code, a new Execution Context (or Call Stack) is created and placed at the top of the Stack.  JavaScript is a single threaded language (which means it runs one call stack at a time).  When the execution of the function is completed, that Execution Context is “popped” (removed) off the top of the Stack, and the code of the previous Execution Context on the Stack beneath it is run, picking up from where it left off from before the code from the popped Execution Context began running.  (Further resources: see this great Youtube video lecture on the Call Stack and the Event Loop)

HOISTING:

  • Refers to the storing of functions and variables in memory by the JavaScript engine during the Creation Phase (see above) before the code actually runs.   All variables are initially stored and set to a value of ‘undefined’, but all functions are stored complete in memory (including the declaration of their name as an identifier for a space in memory to look, and their value (the body of the function, etc.)).
  • This is why you can define a function in your code AFTER you actually call it, but variables will return undefined if they are referenced before their declaration in the code.

Example:

// Calling the function in the code before it's defined:
hoistedFunction();

hoistedFunction() {
  console.log("The function ran and worked!");   
}

In the above Example, the call to hoistedFunction() will log "The function ran and worked!" even though it is called before it is defined.  This is because during the Creation Phase, all functions defined in the code are “hoisted” into memory and made available before the code actually is run in the Execution Phase.  Note that this is different from variables, which are initially set to undefined and cannot be referenced before they are assigned in the code.


THE SCOPE CHAIN:

  • If a variable is used in a function and a value is not found for it inside that function’s scope or block, then JavaScript will look for it’s value in the function’s outer environment context.  If the value is not found there, then it will search the environment of the next outer context, and keep going all the way to the global environment to look for the value for the variable.
  • It should be noted that looking for an outer scoped variable’s value stops when the first match is found.
  • It’s possible to access a variable directly on the global scope with window.[variable name].
  • Lexical Scope:  Scope that is assigned based on where variable and function declarations are written in the code (i.e. functions written inside other function body blocks, variables declared in the global space outside of any function blocks, or inside a function’s scope because they are declared in the body, etc.).

Example of traversing the scope chain:

// a variable created at the top level execution context (global):
const globalVar = "from top level";
// Execution Context is created for initial function:
const exampleFunction = function() {
  const outerVar = "from outer context.";
   // A new Execution Context is created when this inner function runs, but it has access to the immediate outer context it's created in, and also the outer context of it's outer context up the scope chain to the top global level, etc.:
  (function() {
    console.log(outerVar); 
    console.log(globalVar);   
  })();
}

exampleFunction();
// When called, the function logs "from outer context" and then "from top level" - the JS Engine went up the scope chain to find outerVar and globalVar and look for it's value all the way up to the top level global context since they were not defined and assigned a value in the inner function block.

*NOTE THIS QUIRK:  When not in strict mode (‘use strict’), if a variable is not declared with var/let/const but assigned a value, then a variable of that name will be automatically created and implicitly declared in the global scope.

Example:

undeclared = 5;

// A global variable undeclared is created and assigned the value of 5 automatically by JavaScript.
NOTE: If 'use strict' is implemented, then a ReferenceError will be thrown and automatic declaration will not occur.

eval():

  • Built in function in JavaScript that takes a string as an argument, and treats the contents of the string as code that was authored code at that point in the program, consequently altering the corresponding Lexical Scope.
  • Can be used to execute dynamically created code (that’s not
    hard coded initially).
    In other words, you can dynamically generate code that is not hard coded at author time and eval() will inject it as if it were hard coded at author time – this is a way to cheat Lexical Scope (code that is scoped based on where it was authored), but has performance issues and is bad practice.
  •  If a string of code that eval(..) executes contains variable or function declarations, the existing lexical scope in which the eval(..) resides will be modified.
  • Note from reference book listed below: “The use-cases for dynamically generating code inside your program are incredibly rare, as the performance degradations are almost never worth the capability.”

Reference: You Don’t Know JS: Scope & Closures, Chaper 2.


PRIMITIVE TYPES:

Terms:
  • Type:  A category identifier for a piece of data which can be used by the JavaScript engine to determine how to handle the piece of data and what operations can be performed with it. For example, a Number type is assigned to a piece of data that is represented by an integer.  Since the data has a type of Number, JavaScript knows that it can do things like arithmetic with it and another piece of data of the same type, etc.
  • Primitive Type:  Represents a single value in JavaScript that is not an Object type.  (Everything in JavaScript is either a Primitive or an Object).
  • DYNAMIC TYPING:   JavaScript is a dynamically typed language.  The engine figures out and determines what type of data a variable holds (without having to declare it explicitly) while the code is running.  It’s possible for a variable to hold different types of values while the code is running.  You don’t specify what type of data is in a variable (you just use var/const/let, and JavaScript figures out what it is – a Number, Boolean, String, etc.).

6 Primitive Types:

  • Undefined: lack of existence (don’t use this or set variables to this)
  • Null: lack of existence – use this to set variables to nothing (let the engine use undefined). Null is not coerced by JS to 0 for comparisons, but coerced to 0 in other contexts (i.e. with Number() function).

*What is the difference between NULL and UNDEFINED?

null is read by JavaScript to mean that there is no value, but the developer intends it that way and set it to null explicitly (i.e. let x = null;), whereas undefined may throw an error as being an unintended absence of value from not assigning anything to the variable (i.e. let x;), and then accessing it (i.e. console.log(x); ), or by simply not declaring it at all in the first place.  Setting a value to undefined explicitly is not considered good practice.  If you want a value to be assigned as undefined or empty, then set it to null in the code.

  • Boolean:  A primitive that has a value of true or false.
  • Number:  An Integer or floating point number (decimal), i.e. 5 or 5.23 etc.
  • String:  Sequence of characters inside quotes (single or double).
  • Symbol (used in ES6 ):  May not be supported by some browsers.

THE EVENT LOOP:

Terms:
  • Event Loop:  A constantly running process that checks a Task Queue for any callbacks registered which are associated with asynchronous operations or Event Listeners, and pushes them to the Execution Stack whenever it is empty.
  • Task Queue: A built-in feature of the Event Loop that keeps track of and stores registered callbacks for any asynchronous operatons (network requests for example) or Event Listeners (for a ‘click’ Event when a user clicks a specified button for example) which are ready to be run and awaiting a push to the Call Stack from the Event Loop.
  • Web API:  Features and methods that come built-in from the browser and that are provided and made accessible to the JavaScript Runtime Engine  so you can access them in your JavaScript code.  Examples are multi-threaded operations made available by Web API methods such as setTimeout() or AJAX requests over the wire using the XHR (XmlHttpRequest) Object provided by the browser.  Javascript is a single-threaded language, so these features and methods allow access to additional threads which can be used to perform longer-running operations while not blocking the running of JavaScript code.
  • Thread:  A line (or “thread”) of instructions sent to a processor from an application. The set of instructions can be abandoned and come back to later where the processor left off with them last and then complete them (called context switching).
  • Execution Stack (aka Call Stack, or just Stack):  see Creation and Execution Phase entry above).
  • Callback:  a function that is registered to run when an asynchronous operation completes.  These are collected in the Task Queue, which the Event Loop constantly checks to push them to the Stack to run.
  • Event Listener:  A feature which can be accessed in JavaScript code with [element].addEventListener([event], [callback]) that registers a callback function to be run when a specified event occurs.  The browser throws events that can occur which are associated with HTML elements in the DOM as the user interacts with the application (i.e. a ‘click’ event is thrown by the browser when a user clicks on a button element on the page).  The callback registered is then pushed to the Task Queue when the event occurs and the Event Loop will see it and run the callback.

What the Event Loop does:  It’s job is to look at the Task Qeue and the Execution Stack in the JavaScript Runtime and if the Stack is empty, and there is anything (i.e. any callbacks registered) in the Task Queue, then it pushes that callback function to the Execution Stack for JavaScript to run it.


CLOSURES:

  • A closure is a feature of JavaScript which enables a function that is called outside of the scope it was created in (and after that scope’s execution context is cleared from the Stack) to have access to variables and values that were created in it’s original lexical scope (the function block where it was defined).
  • Basically, it’s an encapsulation of values and variables from a scope where a function was defined, so that when that function is passed as a value and called outside of that scope (i.e. returned and used elsewhere in the code), those variables and values remain accessible to it and their values in tact and defined as they were in the original scope.
  • Closures are a commonly used feature whenever you want to pass functions as values to be called at a later time in the code which maintain references to variables in the scope they were created in, and are also used in creating JavaScript Modules, for example, where you can expose methods on a returned object that have references to private, protected, internally defined and scoped variables by invoking a wrapper function which creates a closure, encapsulating those variable values which the exported object methods can reference.
  • IIFE’s (Immediately Invoked Function Expressions) can be used to create a scope and consequently a closure (this can be useful in a for loop, for example to capture the value of i).

Example Use Case with Asynchronous operation in a for loop using a Closure to capture the value of i:

for (var i = 0; i <= 5; i++) {
   (function(i) {
      fetch(`/page${i}`)
        .then(() => {
           console.log(`fetched page ${i}`);
        });
   })(i);
}
// The value of i will be encapsulated by the IIFE on each loop iteration and a reference maintained to it in the asynchronous callback (otherwise the value of i would always be the terminal value since the async function callback runs after the loop is finished and references the value of i at that time.

REVEALING MODULE PATTERN Use Case:

function userModule() {
   const username = "Brent";
   const eyeColor = "brown";

  function username() {
   console.log( username );
  }

  function eyeColor() {
    console.log( eyeColor );
  }

  return {
   username: username,
   eyeColor: eyeColor
  };
}
// Invoke the function to create a closure:
const user = userModule();

user.username(); // "Brent"
user.eyeColor(); // "brown"

// The userModule invocation exposes functions in that module that utilize closures to retain references to private protected variables and values which can be accessed when the exposed functions are called outside of the context they were defined in.

‘USE STRICT’:

  • By typing 'use strict;' in your code, this changes JavaScript’s un-opinionated, loose rules and flexible behavior by preventing type coercion and requiring more explicit syntax.
  • Considered good practice to implement in production code in order to catch potential errors.

Examples of behavior with ‘use strict’:

'use strict'; 

a = 1; // throws an error since var, let, const is not used to declare it. 

17 = '17'; // will throw an error since type coercion is turned off and the string '17' will not be converted to a number or vice versa.

// When calling a function the shorthand way (instead of using fn.call()), this is set to undefined in strict mode:

fn("arg"); // this is undefined.

// Normally when not using strict mode, this is set to the window object in a shorthand function call.
// See this article recommended by Dan Abramov:
Understanding Javascript Invocation and "this" by Yehuda Katz

MISC:

  • Everything in JavaScript is an Object or Primitive data type.
  • JavaScript compiles (translates the human readable code to machine code that the computer can understand and execute) just before execution, as opposed to other languages which are compiled well before.

External Resources/Further Reading:

  • You Don’t Know JS: Up & Going by Kyle Simpson – an excellent book series on Javascript to gain a more sophisticated understanding of how the language works – but written in a way that’s not to dense or difficult to digest.  E-book format is free to read online.
  • wtfjs.com – Funny website with many examples of strange JavaScript behavior.
  • Good article on Scope and THIS – from Digital Web Magazine by Mike West.


…More Items Coming… This list will continue to be updated.

Items planned for future updates:

  • Type Coercion
  • truthy and falsy concept and rules
  • Logical Operators
  • Comparisons
  • This keyword
  • New keyword
  • Prototypal Inheritance
  • The Prototype Chain
  • ES6 Classes
  • Promises
  • Synchronous vs. Asynchronous execution
  • Web APIs that add features and asynchronous functionality to JavaScript

Regular Expressions in a Nutshell

So, you want to validate an email that a user entered into a form to make sure that it is correctly formatted.  No problem, just use a Regular Expression to do this, like the following:

/^(?("")("".+?""@)|(([0-9a-zA-Z]((\.(?!\.))|[-!#\$%&'\*\+/=\?\^`\{\}\|~\w])*)(?<=[0-9a-zA-Z])@))(?(\[)(\[(\d{1,3}\.){3}\d{1,3}\])|(([0-9a-zA-Z][-\w]*[0-9a-zA-Z]\.)+[a-zA-Z]{2,6}))$/
What in the Sam Hill…???

If this was your response (like mine was when first discovering Regular Expressions), then this article is an attempt to demystify and decrypt this mess and explain it in a nutshell, and serve as an introduction to the topic.

Regular Expressions In a Nutshell:

  • In a Quora article about what the most useful and underrated skill in Computer Programming is, Jaime Potter responded that it’s knowing how to use Regular Expressions well.  He posted a picture diagram breaking down the components of a Regular Expression, which I think will best represent them in a nutshell (all credit goes to him as the source of this image diagram):

  • Typically, you would take a Regular Expression (like the one above) and use a matching method (like the preg_match() function in PHP) to see if a specified string matches the search patterns defined in the Regular Expression.  Common use cases  would be validating user submitted form data (for example, an email or address).

Definitions:

  • Regular Expression:  (paraphrased from Wikipedia) A sequence of characters that define a search pattern typically used to find, find and replace, or validate part or all of a string.   (Also referred to as regex or regexp).
  • Delimiter: A character or symbol that identifies a set of data or string of text as complete and separate.  Used to indicate or designate a group of characters or strings in code that are related to each other or an associated task, and to designate a complete statement or group of statements.  In Regular Expressions, the delimiter is the ‘/‘ at the beginning and end which contain it.  Another example would be the ‘;‘ at the end of a statement (i.e. let x = 5;).

REGULAR EXPRESSIONS CHEAT SHEET:

To get started, see this quick reference sheet that I discovered in the User Contributed Notes section of the preg_match() documentation on PHP.net.  This very helpful comment was made by a user named ‘force at md-t dot organd lists out a cheat-sheet for Regular Expression match patterns:

[abc]     A single character: a, b or c
[^abc]     Any single character but a, b, or c
[a-z]     Any single character in the range a-z
[a-zA-Z]     Any single character in the range a-z or A-Z
    Start of line
    End of line
\A     Start of string
\z     End of string
.     Any single character
\s     Any whitespace character
\S     Any non-whitespace character
\d     Any digit
\D     Any non-digit
\w     Any word character (letter, number, underscore)
\W     Any non-word character
\b     Any word boundary character
(...)     Capture everything enclosed
(a|b)     a or b
a?     Zero or one of a
a*     Zero or more of a
a+     One or more of a
a{3}     Exactly 3 of a
a{3,}     3 or more of a
a{3,6}     Between 3 and 6 of a

options: i case insensitive m make dot match newlines x ignore whitespace in regex o perform #{...} substitutions only once

Typical Use Example of Regular Expressions:

  • Validating user submitted form data, such as usernames, emails and addresses, etc. 

For example, to make sure that an email entered is in the correct format (i.e. ‘[email protected]’),  you can use a Regular Expression to define a search pattern that matches the valid email format, and then check to see if the user submitted email matches the pattern (in PHP, you can do this using the preg_match() method which will return 1 if the string matches the pattern defined in the regex).

Example:

$email = $_POST['user_submitted_email'];

$regexp = '/^[^0-9][_a-z0-9-]+(\.[_a-z0-9-]+)*@[a-z0-9-]+(\.[a-z0-9-]+)*(\.[a-z]{2,3})$/';

if (preg_match($regexp, $email)) {
    // process user submitted email;
} else { 
    // Error: email is not in a valid format;
}

Further Reading:

See this one page tutorial on Regular Expressions.  This is from a great site that could be considered a one stop shop for all things Regular Expression related at https://www.regular-expressions.info.  The site breaks down how to use Regular Expressions in a thorough and comprehensive, but digestible manner.

BONUS TIP:

Event Bubbling in a Nutshell

When reading through Stack Overflow posts having to do with Javascript, I sometimes came across the term Event Bubbling and never knew what it was really.  I decided to sit down and spend some time learning about it so I wouldn’t be puzzled anymore by it.  My main learning resources were two excellent Youtube tutorial videos:  Javascript Event Capture, Propogation and Bubbling by Wes Bos and Event Bubbling by The Net Ninja.   This is an excellent article as well on the topic.  I recommend you at least watch the Youtube tutorials, but I am going to attempt to boil the subject down into a single post here.

Event Bubbling In a Nutshell:

  • Events (such as ‘click’ events, for example) are registered not only by the target element where they originate, but by all of that element’s parents all the way up to the global element (i.e. the Window/Browser).
  • An Event occurs (a ‘click’, for example) and the click event is registered (this means recorded or noted and recognized by the browser).  The registered click event then goes from the Window Object down through the child elements and is registered on each during a ‘Capture Phase’ (<html> –> <body> –> <div> –> <form> –> <button>, for example) to find the Target Element (where the click event originated from, i.e. what element was clicked).  Once the click event has registered on the Target (‘Target Phase’), it then bubbles back up the DOM Tree (‘Event Bubbling Phase’) and is registered on all parent elements up through the Window Object triggering any Event Listeners or Handlers in the process.

Why it’s important to understand: 

  • To avoid unintentional Event Handle triggering on parent elements of the target, or to intentionally incorporate handling the event on a parent element. 
  • If there are any identical Event Listeners on the parent elements of the Event Target, then their respective Event Handlers will be triggered.  A click event on element A will trigger element A’s Event Handler as well as Element A’s parents’ Event Handlers for a click event.  

For more information and examples, keep reading:

Definitions:

  • Window Object: My non-technical understanding is to just think of it as the browser or the window you have open in the browser.  It contains all of the elements on the page.
  • Event Target:  The element that the Event originated from (i.e. the element that was clicked, for example).
  • Event Capture: The process of recording events that occur starting at the top of the DOM (the Window Object) and down through the parent elements related to the Event Target.
  • Event Propagation: To propagate, literally means to spread and promote widely.  The event is ‘spread widely’ and registered throughout the DOM tree from the top (Window Object) down to the event target, and back up to the top again.
  • Event Bubbling: The process in which the Event is registered on each successive parent element of the Event Target element all the way up to the Window Object.
  • Event Target Phase: This occurs in between the Capture and Bubbling Phase during Event Propagation.  During this phase, any listeners on the Event Target for the Event and their respective functions will be triggered and invoked.

The Process:

Event Bubbling happens in the course of what’s called Event Propagation, which has three main parts:

  • The Capture Phase: The event is recorded from the top of the DOM and down to find the event target.
  • The Target Phase: The Event is registered on the Target (the element it originated from) and any Listeners or Handlers are fired.
  • The Event Bubbling Phase:  After the Capture and Event Target Phase, the event is registered on each parent element of the Event Target, in order, up through the DOM Tree to the Window Object.

Important Note: Branch paths in the DOM for Events during Event Bubbling are static:  If the DOM tree is modified after the Event Listeners have been assigned, the modified DOM tree or added elements will not be used or included in the Event Bubbling process.

For example, if the handling of the Event involves creating/appending/inserting an additional parent element of the Event Target, then the inserted parent element will not register the Event as it bubbles up the DOM tree on future click events originating from the Event Target.  The Event will bubble only up through parent elements present in the DOM Tree when the Event Listener for that target was assigned (for instance, at the loading up of the page).

Additionally, an Event Listener that is assigned to a class of elements will not be applied to any elements of that class that are later added to the DOM Tree.

Scenarios Where Understanding Event Bubbling Can Help:

Example (consider the following HTML which contains a list of items with buttons that give the user the option to remove the item from the list, or add an item to the list):

<div>
  <ul id='theList'>
     <li id='item_copy'>List Item
       <button class='btn_remove'>Remove</button>
     </li>
     <li>List Item
        <button class='btn_remove'>Remove</button>
     </li>
  </ul>
  <button id='btn_add'>Add Item</button>
</div>

Now, the Javascript to assign Event Listeners and Handlers:

// Add a list item to the list when Add Item clicked:
<script>
const parent_el = document.getElementById('theList');
const li_content = document.getElementById('item_copy').innerHTML;
const add_btn = document.getElementById('btn_add');

add_btn.addEventListener('click', () => { 
    let created_li = document.createElement('li'); 
    created_li.innerHTML = li_content;
    parent_el.appendChild(created_li); 
});
// Assigns click event listener and handler for the remove buttons currently on the page: 
const remove_btns = document.getElementsByClassName('btn_remove');

// A click on .btn_remove removes item from the list: 
 Array.from(remove_btns).forEach(function(btn) {
     btn.addEventListener('click', (e) => {
     let target_btn = e.target;
     let li_to_remove = target_btn.parentElement;
     li_to_remove.remove();
     });
 });
</script>

In the above example, the remove buttons will not work on list items that are added by the user with the Add Item button.  The reason is because when the Event Listeners were assigned to the Remove buttons, the DOM  Tree did not include the added list items created when the user clicks Add Item.  So the Event Listeners and click handlers don’t exist on the newly created list items.

This is where Event Bubbling can come in to save the day.  You use this process to your advantage to solve this problem by assigning the Event Listener and Handler for the click to the parent element of the user added list items (this would be the <ul> with the id of “theList”).

This way when the user clicks on the remove button on the newly created list item, the click event will bubble up through the parent elements and the Event Listener on <ul> “theList” will be ready and waiting for it.  Once the click on the newly added remove button registers on <ul>, it’s target can be found and the remove element function fired.

Example:

 // Grab the pre-existing parent element (<ul>): 
 const the_List = document.getElementById('theList');
 // Add the listener to #theList and pass in the 
    event:
 the_List.addEventListener('click', (e) => {

 // Check to see what the Event Target of the caught    
    click was.
 // If it was the remove btn, then remove the list
    item:
 if (e.target.className == 'btn_remove') {
     let list_item = e.target.parentElement;
     list_item.remove();
     }
 });

Now, the list items added by the user after the page loads will be removed when the user clicks the remove button.  The <ul> ‘theList’ catches the click event as it bubbles up the DOM tree and handles it by finding the Event Target (the remove button clicked) and removing the parent element of it (the list item).

Hopefully, this summary on Event Bubbling will prove to be helpful to those wanting to get their feet wet in the subject and start to understand what it is and how understanding it can help solve problems like this that come up in your code.

OBJECT ORIENTED PROGRAMMING IN A NUTSHELL

This post is a brief overview of the fundamentals and principles of Object Oriented Prgramming (OOP).  It is a summary of my notes from an online course in PHP (see end of article for reference), so most of the examples are in PHP, but the principles are universal to OOP.

OOP In a Nutshell:

  • OOP (Object Oriented Programming) refers to a method of programming that works with data which is  grouped into a set called an ‘Object’.   
  • The Object can have properties (stored data) and/or methods (functions that the object can run and call).
  • The Object can be based on a blueprint or parent which defines properties and methods it inherits and has access to and can use (further abstracted and managed by an Interface in some cases).  An example of a blueprint or parent that Objects inherit from would be Classes.

That’s just the tip of the tip of the iceberg.  If your interested in the rest of the tip of the iceberg, then here is some more information:

Definitions:

  • Object: A set of data grouped together by a common theme.  An object could be stored in a variable, function or data structure.  Objects consist of key/value pairs (the key is a placeholder(or representative name) for data, and the value is the actual data stored and associated with the key).
  • Class: Describes the properties and methods of an object (it is like a blueprint or definition of an object). Properties can be variables, arrays, or data;  Methods are functions that create/define behaviors of the object.
  • Property: A key/value pair in an Object that stores descriptive data (for example, an Object holding data about a person could have a property key of ‘name’, which would hold the person’s name as the value).
  • Method: A key/value pair in an Object that stores behavioral data (i.e. a function that does something – for example, modifies some property data, or gets additional data and uses it somehow).  The term ‘Method‘ and ‘Function‘ mean basically the same thing.  When talking about Objects, a ‘Method‘ is basically a function that is stored inside of and can be called from an Object.
  • Instantiation: calling the class with the new keyword to make the properties and methods accessible to an object that is created (by assigning a variable to it).  Example:  $obj = new Class_name();
  • Instance: an object (represented by a variable, for example) that has access to and references  the properties and methods of a parent class.  The instance is created through the process of instantiation (using the new keyword; see above).  In other words, an object is an instance of a class.

Benefits of using OOP (Object Oriented Programming):

  • Enables modular functionality in code.  Complex functionality can be accomplished while simplifying the code and making it cleaner (easier to read and understand).
  • Updating the code or modifying and adding features and functionality is also made easier by using OOP.

CLASSES:

  • To create a Class use the class keyword, then make a name:

Note: The first letter of the name of the class must be CAPITALIZED!

Example (A Class named Car is created and a property and method are assigned to it):

class Car {
//Methods and properties go here;
//Example property:
     var $doors = 4;
//Example method:
     function moveWheels(){
         echo "Wheels are moving!";
     }
}
Other things to note in class creation:
  • When creating a class, create the properties before creating the
    methods.
  • Use the keyword var to create properties (you can assign values or not).
  • You can use method_exists(“methodName”); for debugging if trying to find methods in a lot of code.
Creating properties in the class:
  • Use the keyword var to create properties (you can assign values or not):

Example (the class Car is created with properties and methods defined.  The -> is an access operator that is similar to the . in Javascript):

class Car {
    //(properties created with var)
    var $wheels = 4; 
    var $hood = 1;
    var $engine = 1;
    var $doors = 4;

//Methods(functions) in the class:
//To modify or assign values to properties, use $this variable (refers to the object/class that it is in):

    function changeWheels() {
        $this->wheels = 10; 
        //changes the wheels property value.         
        //Note: you don't use the $ when
        //referencing the properties in this
        //function method to set them.
     }

    function moveWheels(){
        echo "Wheels are moving!";
    }
}

OBJECTS:

To use the properties and methods of a class in an object:

  • Create an instance of the class: use the keyword new followed by class_Name(); i.e. new Car(); <—this creates an ‘instance’ of the class.
  • Assign the instance of the class to a variable – the variable now
    stores the instance of the class and is an object that has access to
    properties and methods of the assigned class.

Example:

$hondaFit = new Car(); 
//this creates an instance of the Car class assigned to $hondaFit (which can be called an object).
To access methods/properties:
  • To access a property/method use the -> operator and the name of the property/method (without the $ included) in PHP.  In Javascript, use the . operator (objectName.property):
Example:
  $hondaFit->wheels;  //returns the value.   
//or 
  echo $hondaFit->wheels; //<--this echoes '4'.

//Example (method access): 
  $hondaFit->moveWheels();

//Modify or assign a value to the object property:
  $hondaFit->wheels = 10; 
//reassigns the value of $wheels to 10.

INHERITANCE:

  • A class can inherit and access the properties and methods of other classes by using the extends keyword:

Example:

class Class_A extends Class_B {

//Class_A now has access to props and methods of      //Class_B.

//Props and methods can be added which Class_A will have in addition to those of Class_B.

//you can override the parent (Class_A) property by using var and assigning a new value to it:
var $propNameFromClass_A = newValue;
}

CONSTRUCTORS:

  • Constructor functions execute every time a new instance is created of the parent class they’re created in (with the new keyword).

Examples of practical use:

  • Create default values when a user is created or some default values of a new object that are automatically created when the object is instantiated.
  •  Automatic validations and site maintenance when new objects are created.

Create a constructor in PHP using function, two
underscores, and construct :

Example:

class Class_A {
    function __construct(){
       //code goes here; this runs every time a new
       //instance of Class_A occurs.
    }
}

DATA ACCESSORS:

Three Types:
  • Public — available to the whole program – scope is global.
  • Protected — only available to the parent class or sub-classes
    (extended) that inherit from the parent.
  •  Private — only available to the parent class (not accessible by
    extended classes).

You can use accessors on methods and properties, as well as classes.

Syntax: put the access type (public protected or private) before the class keyword or variable/property name:

Example:

public class Class_A {
    private $prop1 = value; 
    //only accessible inside the class
}

Uses:
-can be used to hide as much of the inner workings of an object as possible. That way it is less likely to break. 
-If you make everything public, then another programmer might alter a variable which you don't want changed by anything other than the inner workings of your object.

STATIC MODIFIERS:

  • This makes a method or property only accessible by the class and not by an instance or object.
  • It allows the use of a property or method of a class without having to
    make an instance of it.
  • Static properties can be referenced in methods inside the class by
    using ClassName::$property

Use the static keyword in place of var:

class Class_A {
    static $property = value; 
//the property is attached to the class and
//not the instance of it.
    function funcName {
    Class_A::$property = newValue; 
    //use :: syntax to access static properties.
    }
}

Note: when accessing static data in the Class, use the $ in the variable name if present (as opposed to omitting it when working with an instance).

To access the static property or method:

Insert :: after the class name to access static data: 

Example: 

echo Class_A::$property;

or

Class_A::funcName(); 
//executes the method using the static property.

S.O.L.I.D. DESIGN PRINCIPLES IN OOP:

  • Fundamental OOP design patterns and concepts to make your code easier to maintain, debug and read.

S.O.L.I.D. stands for:

  • Single Responsibility Principle (SRP): Classes should have one and only one job, or should have one and only one reason to change.
  • Open/Closed Principle (OCP):  Classes/objects should be open for extension, but closed for modification. Easily extend a class without modifying it, make functionality in the class as abstract and broad as possible and leave more specific tasks and computation in the sub-classes that extend it.
  • Liskov Substitution Principle:  Every subclass should be substitutable for their base/parent class. The functionality and methods/properties of a subclass should not remove or significantly differ from the functionality/logic of it’s base/parent class it extends, so that uses of it as a type of the parent class will not break or not work as expected.
  • Interface Segregation Principle (ISP):  No client should be forced to depend on methods it does not use.  Interfaces belong to their clients and not to the implementations. Thus, we should always design them in a way to best suite our clients. we should break our interfaces in many smaller ones, so they better satisfy the exact needs of our clients. Interfaces are just plain function name definitions. There is no implementation of any kind of logic in them.. great advantage of clients depending only and only on what they actually need and use.
    *** ISP recommends that you should use many specialized interfaces instead one big interface. Interfaces belong to their clients and should represent what the clients need. This helps reducing dependencies on methods the client is not using.
  • Dependency Inversion Principle (DIP):  High-level modules should not depend on low-level modules.  Both should depend on abstractions.  Abstractions should not depend upon details. Details should depend upon abstractions.  Common solution is to implement Interfaces which are objects that specify what methods are available to classes or objects that implement them.

DESIGN PATTERNS IN OOP:

  • Singleton:  An object of which there is one and always only one copy or instance.  The object is not instantiated with copies that inherit from it or duplicated anywhere else in the application code.  The purpose of using a singleton could include conserving memory space and provide a single instance of an object that serves as a central and global resource that you need to manage throughout the application (i.e. a log).   The pattern is criticized because since it can expose your object to the global namespace, but if used carefully and depending on the use case, it can be an appropriate solution and pattern to implement.

FURTHER READING AND RESOURCES: 


Helpful Bonus Tips:

  • To check if a Class exists use class_exists("class_Name");  returns a boolean.  Can be used for debugging.
  • You can also use method_exists("method_Name"); to check for a method.  Can be used for debugging if trying to find methods in a lot of code.

This blog post is a summary of my notes taken from an online course on Udemy by Edwin Diaz called PHP for Beginners – Become a PHP Master – CMS Project.  There is a section on Object Oriented Programming in the course that was excellent and explained the fundamental concepts clearly and efficiently.   I’ve tried to boil the concepts down into a quick read as an introductory crash course to get started.